Table of Contents
- Getting Started
- Agent-Based Monitoring
- Data Providers
- Directory Services
- Auditing
- Hosts
- Templates
- Template Properties
- Batch Update Templates
- Log Management Templates
- File and Directory Monitor Templates
- Windows Monitor Templates
- Account Lockout Monitor Template
- Logon Monitor Template
- CPU Monitor Template
- Memory Monitor Template
- Disk Space Monitor Template
- SMART Monitor Template
- Windows Update Template
- Process Monitor Template
- Service Monitor Template
- Performance Counter Monitor Template
- PowerShell Template
- Registry Value Monitor Template
- Active Directory User Monitor Template
- Active Directory User Integrity Monitor Template
- Task Scheduler Template
- Clock Synchronization Template
- Defragment NTFS Disks Template
- Network and Application Monitor Templates
- Database Monitor Template
- Directory Service Monitor Template
- DNS Blacklist Monitor Template
- DNS Monitor Template
- Domain Expiration Monitor Template
- Network Speed Monitor Template
- Ping Monitor Template
- Database Table Reseed
- SQL Server Shrink and Backup Template
- SSH Shell
- TCP Port Scan Monitor Template
- Website Monitor Template
- SSL Certificate Monitor Templates
- Email Monitor Templates
- SNMP Monitor Templates
- Monitors
- Reports
- Auto-Configurators
- Filters
- Actions
- Desktop Actions
- Email Actions
- Event Log Actions
- Executable Actions
- File Actions
- IIS IP Address Restriction Actions
- Microsoft Teams Actions
- PowerShell Actions
- Report Actions
- Service Actions
- SMS Actions
- SNMP Trap Actions
- Syslog Actions
- Template Actions
- IIS IP Address Restriction Actions
- Action Variables
- Schedules
- Environment Variables
- Options
- Account Lockout Monitoring and Reporting
- Merging Logs
- SNMP
- SSH Shell
- Syslog
- Exporting and Importing Configuration Objects
- Shared Views
- Auto-Config Host Assignment Properties
- General Executable Properties
- Assign Actions
- Assign Directories
- Assign Disks
- Assign Shares
- Assign Files
- Assign Consolidated Logs
- Assign Event Logs
- Assign Azure Audit Logs
- Target Files and Sub-Directories
- Define Log Entry Columns
- Define Log Entry Columns with Regular Expressions
- Define CSV and W3C Log Entry Columns
- Active Directory User and Group Filters
- Explicitly Assigned Logs
- File Explorer
- Report Columns
- Report Date/Time Ranges
- Report Security Event Log Filters
- Select Folder or File
- Executable Timeline
- Command Line Interface
- Troubleshooting
- Terminology
Corner Bowl Server Manager
SIEM, IPS, Server Monitoring, Uptime Monitoring and Compliance Software
Intrusion Prevention System (IPS) - IIS IP Address Restriction Actions
IIS IP Address Restriction Actions enable you to automatically block IPs that are actively attacking an IIS Web Server. This action is typically used by network administrators that want to automatically detect, Intrusion Detection System (IPS), and block attacking IPs, Intrusion Prevention System (IPS).
 |
Use this Action in conjunction with an Intrusion Detection System (IDS) Template (e.g. IIS W3C Log Monitor or IIS W3C Log Consolidation configured to simultaneously monitor the file contents). Once the IIS IP Address Restriction Action is assigned to the IDS, the result is an Intrusion Prevention System (IPS) Action. |

In this Topic
- To create an IIS IP Address Restriction Action
- To create an IDS IIS W3C Log Monitor
- Testing the IIS IP Address Restriction Action
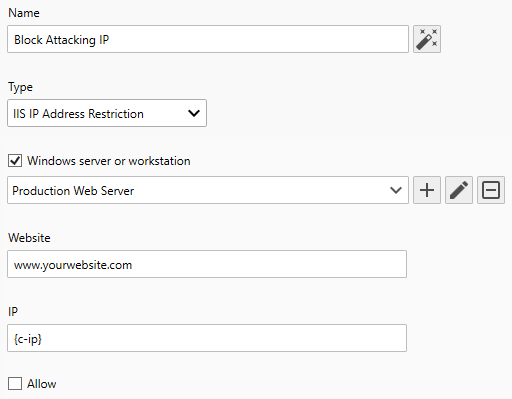
To create an IIS IP Address Restriction Action
- From the Menu Bar select File | New. The Create New Object View displays.
- Select Alerts and Actions. The New Action view displays.
- Use the Name text box to specify a unique name.
- From the Type drop-down select IIS IP Address Restriction.
-
Use the Windows server or workstation drop-down to target the managed server running IIS.

This action requires the Agent to be installed on each managed system and each assigned Template configured to use the Agent. For more information see: Agents - Use the Website textbox to specify the friendly name of the website as listed in IIS Manager.
- Use the IP textbox to specify the {key} you defined in your IDS IIS W3C Log Monitor. The default value is {c-ip}. The key must be wrapped with {} characters.
To test this action, specify a real IP address in this field, then once successfully tested, verify the results in IIS Manager. Once verified, don't forget to set this value back to {c-ip} before saving. - Use the Allow checkbox to either block (unchecked) or pass (checked) the IP address's requests.
Intrusion Prevention System (IPS) - IIS IP Restriction Action
To create an IDS IIS W3C Log Monitor
When setting up your IDS IIS W3C Log Monitor or Consolidation Template, add a monitor, set the Filter Type to Column Frequency, assign a filter (e.g. 404 and 500 HTTP Response Codes), set the column key to c-ip to group HTTP requests by calling IP address, then lastly, set the frequency (e.g. > 50 times every 1 minute).
|
The c-ip column must be defined in your IDS IIS W3C Log Monitor or Consolidation Template. |
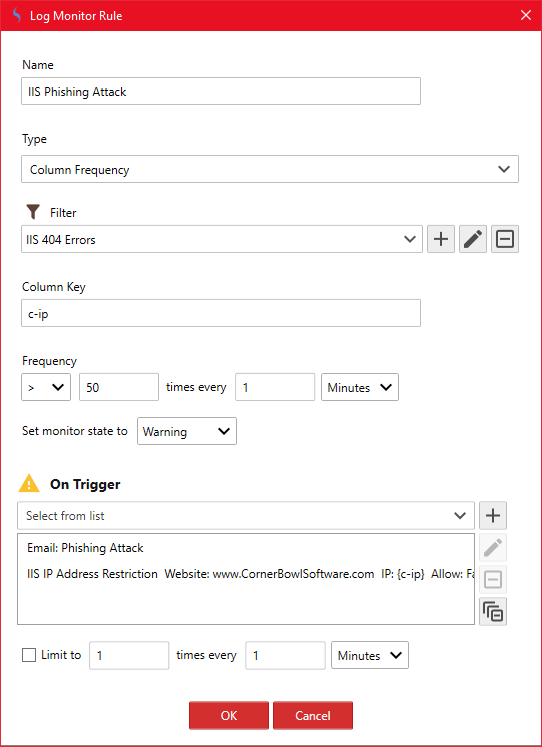
IDS IIS Phishing Attach Rule with IPS IIS IP Restriction Action
Testing the IIS IP Address Restriction Action
- Use the Select server or workstation drop-down to specify the managed system to test the action on.
- Click the Test button.
When managing a remote machine, the rule is added through the Agent on the managed machine. If the managed machine is configured to keep the Agent connected, the test is immediate, otherwise the test is queued to execute the next time the Agent connects. If the Agent is configured to connect at a frequency greater than once a minute, the test may timeout, however, the rule will still be added the next time the Agent connects.