Table of Contents
- Getting Started
- Agent-Based Monitoring
- Data Providers
- Directory Services
- Auditing
- Hosts
- Templates
- Template Properties
- Batch Update Templates
- Log Management Templates
- File and Directory Monitor Templates
- Windows Monitor Templates
- Account Lockout Monitor Template
- Logon Monitor Template
- CPU Monitor Template
- Memory Monitor Template
- Disk Space Monitor Template
- SMART Monitor Template
- Windows Update Template
- Process Monitor Template
- Service Monitor Template
- Performance Counter Monitor Template
- PowerShell Template
- Registry Value Monitor Template
- Active Directory User Monitor Template
- Active Directory User Integrity Monitor Template
- Task Scheduler Template
- Clock Synchronization Template
- Defragment NTFS Disks Template
- Network and Application Monitor Templates
- Database Monitor Template
- Directory Service Monitor Template
- DNS Blacklist Monitor Template
- DNS Monitor Template
- Domain Expiration Monitor Template
- Network Speed Monitor Template
- Ping Monitor Template
- Database Table Reseed
- SQL Server Shrink and Backup Template
- SSH Shell
- TCP Port Scan Monitor Template
- Website Monitor Template
- SSL Certificate Monitor Templates
- Email Monitor Templates
- SNMP Monitor Templates
- Monitors
- Reports
- Auto-Configurators
- Filters
- Actions
- Desktop Actions
- Email Actions
- Event Log Actions
- Executable Actions
- File Actions
- IIS IP Address Restriction Actions
- Microsoft Teams Actions
- PowerShell Actions
- Report Actions
- Service Actions
- SMS Actions
- SNMP Trap Actions
- Syslog Actions
- Template Actions
- IIS IP Address Restriction Actions
- Action Variables
- Schedules
- Environment Variables
- Options
- Account Lockout Monitoring and Reporting
- Merging Logs
- SNMP
- SSH Shell
- Syslog
- Exporting and Importing Configuration Objects
- Shared Views
- Auto-Config Host Assignment Properties
- General Executable Properties
- Assign Actions
- Assign Directories
- Assign Disks
- Assign Shares
- Assign Files
- Assign Consolidated Logs
- Assign Event Logs
- Assign Azure Audit Logs
- Target Files and Sub-Directories
- Define Log Entry Columns
- Define Log Entry Columns with Regular Expressions
- Define CSV and W3C Log Entry Columns
- Active Directory User and Group Filters
- Explicitly Assigned Logs
- File Explorer
- Report Columns
- Report Date/Time Ranges
- Report Security Event Log Filters
- Select Folder or File
- Executable Timeline
- Command Line Interface
- Troubleshooting
- Terminology
Agent-Based Management
In this Topic
- Background
- The Corner Bowl Server Manager Agent
- Supported Templates
- How to configure the Agent Server
- How to automatically install the Agent on remote hosts
- How to manually install the Agent on Windows
- How to manually install the Agent on Linux
- How to update the Agent configuration
- How to configure Agent-Based templates
- Troubleshooting
Background
Server Manager includes an agent-based solution to remotely manage both Windows and Linux hosts. Our agent-based solution solves several potential problems with existing built-in technologies and security implementations. To understand the benefits, we must first understand the technologies used to remotely manage Windows and Linux hosts without an agent.
Agentless Management
Windows
Windows Event Logs are downloaded using remote WMI while Text Logs use either Windows Shares, SFTP/SSH or FTP/S to download logs. Most monitors, such as CPU, Memory and Disk Space use remote WMI to query information. Other monitors, such as Windows Certificates and Performance Counters, rely on other seemingly undocumented Microsoft APIs.
Security and Performance Concerns
- Attack Surface Reduction Rules do not permit remote WMI event subscriptions.
- In most hardened environments, monitoring and compliance services are not permitted to run as domain or local administrators.
- In most hardened environments, remote WMI and other Microsoft APIs are not permitted.
- Cloud-based servers cannot typically be managed by remote WMI.
- Windows blocks discovery and remote management of remote Windows Certificate Stores.
- WMI is needlessly slow when transmitting Event Log entries and often throws what seems are random errors on a random basis.
- WMI requires multiple ports, one of which is randomly assigned. The randomly assigned port can be configured to use a fixed port, however, the fixed port must be configured on each client host.
- In rare cases, WMI corrupts itself requiring the WMI service to be restarted or repaired.
- Hosts that periodically connect to the local network (e.g. Law Enforcement laptops), can be difficult to manage on a polling schedule. The polling schedule must be fast enough to catch each managed laptop when they just so happen to be logged into the local network often generating unnecessary traffic as well as a high number of errors in the meantime.
Linux (RedHat (RHEL) and Ubuntu)
Linux audit logs are downloaded using a two step process. First, audit logs must be copied to a temporary directory using Superuser permissions over an SSH connection so yet another SFTP can download the file.
Security and Performance Concerns
- SSH commands often require elevated Superuser permissions.
- SFTP has limited access to operating system files.
- Audit Log consolidation is highly inefficient requiring entire log files to be continually re-downloaded prior to extracting the latest entries.
Agent-Based Management Benefits
- Both the Windows Management Service and the Windows Agent Service can be run using the built-in SYSTEM Account eliminating the requirement to run as a Domain Administrator.
- All data is transmitted over a single TLS 1.2 capable TCP/IP port using a highly efficient binary protocol stack that downloads Windows Event Logs 12 times faster than remote WMI.
- Linux Audit Logs are efficiently accessed, parsed, and filtered directly on Linux hosts prior to transmitting the latest filtered entries to the Management Server.
The Corner Bowl Server Manager Agent
Many of the Windows Templates include an Agent-Based Template flag. Once an Agent-Based Template is assigned to a remote host, Server Manager uses Windows Shares to upload the Agent installation file to the host then uses WMI to remote install onto the host. If Server Manager is unable to penetrate the firewall to upload and remote install, you have the option to manually install the Agent to the remote host. Once installed, by default, the Agent connects once a minute to get list of templates to execute. The connection frequency can be overridden. Once Templates and Filters are received, the Agent executes the Templates and applies the Filters. Finally, data is transmitted to the management server.
 |
Important! The Agent requires the .Net 7 Runtime. Our installers automatically install the runtime when not already installed, however the installer needs Internet access. If Internet access is not available, please download and install the runtime from Microsoft. |
Supported Templates
The following templates are currently supported:
- CPU Monitor
- Clock Synchronization (NTP)
- Defragment NTFS Disks
- Delete Temporary Files
- Directory Size Monitor
- Disk Space Monitor
- Event Log Consolidation
- Event Log File Backup
- Event Log Monitor
- File Monitor
- File Integrity Monitor (FIM)
- Memory
- Performance Counter Monitor
- Process Monitor
- Registry Monitor
- Service Monitor
- SMART Disk Monitor
- SQL Server Shirk and Backup
- Task Scheduler
- TCP Port Scan Monitor
- Text Log Consolidation
- Text Log Monitor
- Windows SSL Certificate Monitor
How to configure the Agent Server
- From the Explorer View, navigate to then select Agent Server. The Agent Server Properties View displays.
-
The Agent Server Properties View contains 2 tabs.
- Options
- Assignments
The Options Tab
-
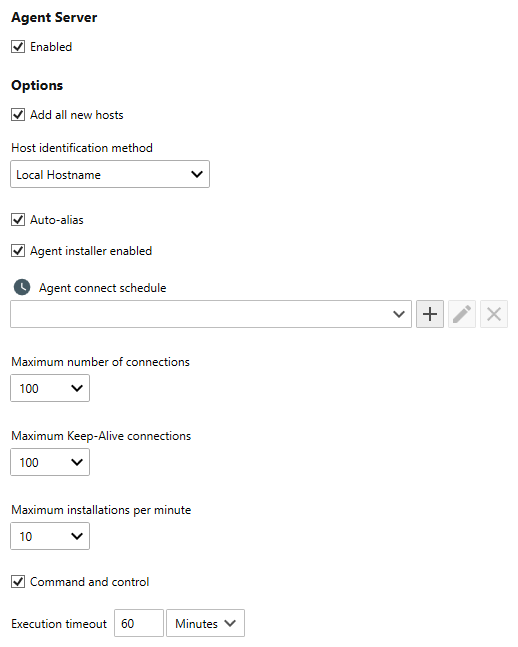
From the Agent Server Properties View use the Enabled check box to enable or disable the Agent Server.

Once enabled, the server attempts to install the Agent to all configured hosts that have Agent-Based Templates assigned to them. If you do not want to automatically install the Agent to each host that has an Agent-Based Template assigned, you can either globally disable the Agent installer (below) or disable specific hosts via the Host Properties View. For more information see: Host Properties - Use the Add all new hosts check box to automatically add any agent host to the software when initially connecting.
-
Use the Host identification method drop-down to select how you would like new hosts to be identified.
Option Description DNS Lookup The server uses DNS to resolve the hostname. DNS and FQDN Lookup The server uses DNS and Active Directory to resolve the Fully Qualified Domain Name (FQDN). Remote IP Address The server uses the IP address. Local Hostname The agent sends its local hostname to server for identification. Local FQDN The agent sends its locally resolved FQDN to server for identification. Local IP Address The agent sends its local IP address to server for identification. -
Use the Auto-alias checkbox to automatically set the host's alias using the value derived from the identification method when the
device is connecting for the first time and the device's IP address has already been added to Server Manager.
This option has been made available so cloud-based Windows and Linux servers can be accessed using their public IP address while at the same time automatically displaying in the Management Console using the preferred identification method. -
Use the Agent installer enabled check box to use WMI and Windows Shares to automatically install the Agent Service to each host that has an Agent-Based Template assigned.
Once installed, Server Manager automatically updates out-of-date agents. When an agent connects, if the agent is a lower version than the server, the agent automatically downloads the latest installer directly on the connected TCP/IP socket. Internet access is not required. Once downloaded, the agent automatically updates itself. The Agent Server does not update agents running on Windows Server 2008 R2, Windows 8 and Windows 7. To use our agent on those operating systems, install the Corner Bowl Server Manager 2022 Agent. -
Use the Agent connect schedule drop-down to select the schedule or frequency you want all of your Agents to connect. By default, the agent connects once a minute.
- When a real-time schedule is assigned, agents re-connect every minute.
- When a range schedule is assigned, agents re-connect at a random interval within the specified time range.
To override this value for a host group or specific Windows Host, from the Explorer View, select the target host group or Windows Host, right click, then select Host Properties. The Host Properties View displays. From the General Tab, use the Agent connect schedule drop-down to override this value. To enable Real-Time Event Log Monitoring, from the Explorer View, select the target host group or Windows Host, right click, then select Host Properties. The Host Properties View displays. From the General Tab, set the Keep agent connected option, then use the Assignments View to assign a Real-Time Agent-Based Event Log Monitor Template . ![Agent Server Properties View]() Agent Server Properties View
Agent Server Properties View -
Selecting the Assignments Tab reveals a blacklist as well as various lists of
objects to automatically assign to the newly added devices. By default, all new
hosts are added to a node called Agent Devices, however if you assign
another group or set of groups to the Hosts Groups List, new hosts are only
added to those groups.
By default, the following sample templates are assigned to each host: Event Log Consolidation (Application, System) (Agent) and Event Log Consolidation (Security) (Agent) and Event Log File Backup (Agent) templates are assigned enabling Windows Application, Security and System Event Logs entries to be automatically saved to the centralized log database, and, for the defense industry, the raw EVTX files centrally saved to the management server.
How to automatically install the Agent on managed hosts
- From the Explorer View, navigate to Agent Server then right click and select Properties. The Agent Server Properties View displays.
- Check Enabled.
- Click Save.
- Manually add the Windows and Linux hosts to Server Manager. For more information see: Adding Hosts.
- Assign any agent-based Template to the host or the host's group.
-
Once assigned, Server Manager will attempt to remote install the Agent onto each assigned host.
-
Windows installations use remote WMI and Windows shares to install the Agent Service.
Firewalled and Air Gapped Installations: The Agent requires .Net 7 Runtime. The installer's bootstrapper checks, then automatically downloads the required framework from Microsoft. If remote managed hosts are firewalled or air gapped, you can instead download a version of the installer that includes .Net 7 within the installation's bootstrapper from Corner Bowl Software's' website. Once downloaded, place the file into the installation directory (e.g. c:\Program Files\Corner Bowl\Server Manager). Do not change the filename, it must be ServerManagerAgentDotNetInstaller.exe. When Server Manager detects the current major version of the agent has not yet been installed, this file is uploaded instead of the default lightweight Agent only installer. There is no need to continually update this file because, once installed, the Agent is automatically updated to the version running on the Management Server. -
Linux installations use SSH and SFTP to install the Agent Daemon.
To automatically install the agent on a Linux host, you must first configure the SSH/SFTP connection via the SSH/SFTP Properties View. At this time, the .Net 7 Runtime must be pre-installed.
-
Windows installations use remote WMI and Windows shares to install the Agent Service.
How to manually install the Agent on Windows
- From each target host, install the .Net Runtime 7.0.x.
-
From the host you have installed Server Manager, copy the following file to each target host:C:\Program Files\Corner Bowl\Server Manager\ServerManagerAgentInstaller.exe
-
From each target host, open a command prompt as Administrator then run the executable with the following command line options:
Parameter Description HOST The fully qualified hostname of the host Server Manager is installed. PORT The port to connect with. The default value is 21843 TLSENABLED true to enable TLS 1.2. Please note the server must be configured to use TLS. For more information see: Server Configuration TLSCERTIFICATE The optional TLS client certificate to use for TLS 1.2. -q Silently run the installation. -norestart Suppress reboot. For Example:ServerManagerAgentInstaller.exe -q HOST=1.2.3.4 PORT=21843
|
Firewalled and Air Gapped Installations: The Agent requires .Net 7 Runtime. The installer's bootstrapper checks, then automatically downloads the required framework from Microsoft. If remote managed hosts are firewalled or air gapped, you can instead download a version of the installer that includes .Net 7 within the installation's bootstrapper from Corner Bowl Software's' website. Once downloaded, use this version of the installer. |
How to manually install the Agent on Linux
-
Install .Net 7.
RedHat Enterprise Linux (RHEL)
sudo yum install dotnet-sdk-7.0 -y
Ubuntu:
wget https://packages.microsoft.com/config/ubuntu/22.04/packages-microsoft-prod.deb
sudo dpkg -i packages-microsoft-prod.deb
sudo apt install apt-transport-https
sudo apt update
sudo apt install dotnet-sdk-7.0
-
From the host you have installed Server Manager, copy the following directory and files to the target host:C:\Program Files\Corner Bowl\Server Manager\Agent Installers\Linux
- Copy then modify the Management Server's tcpserver.json file so the Host parameter is set to the IP address or hostname of the Management Server, then, upload to the target host.
-
Copy all of the dll and json files to the target installation directory. By default this is:
/usr/bin/corner-bowl/server-manager-agentFor example:sudo cp ./*.dll /usr/bin/corner-bowl/server-manager-agentsudo cp ./*.json /usr/bin/corner-bowl/server-manager-agent
-
Copy the systemD service file, cbsmagt.service, to the following directory:
/etc/systemd/systemFor example:sudo cp ./cbsmagt.service /etc/systemd/system
-
Copy the configuration file, tcpserver.json, to the following directory:
/usr/share/corner-bowl/server-manager-agentFor example:sudo cp ./tcpserver.json /usr/share/corner-bowl/server-manager-agent
-
Reload the systemctl:
sudo systemctl daemon-reload
-
Configure the Daemon to start when the server is booted:
sudo systemctl enable cbsmagt
-
Start the Daemon:
sudo systemctl start cbsmagt
How to update the Agent configuration
The Agent uses a JSON configuration file to load the parameters to connect to the Management Server. Configuration is implemented through the tcpserver.json file located in the program data directory.
On Windows, the default location is:
C:\ProgramData\Corner Bowl\Server Manager Agent\tcpserver.json
On Linux, the default location is:
/etc/corner-bowl/server-manager-agent/tcpserver.json
Configuration File Reference
{
  "Host": "SERVERNAME",
  "Port": 21843,
  "IdleTimeout": 300,
  "ReceiveTimeout": 120,
  "SendTimeout": 120,
  "TlsConfiguration": {
    "Enabled": false,
    "Certificate": null,
    "RequireRemoteCertificate": false,
    "AllowSelfSignedCertificate": true,
    "CheckCertificateRevocation": false,
    "AllowCertificateChainErrors": true
  }
}
For more information see: Server Configuration
How to configure Agent-Based templates
- Select File | New Template. The Select Template Type view displays.
- Click the Template type to create. The Template Properties view displays.
- Select the Agent Template Tab
- Use the Enabled Check Box to flag the template as an Agent-Based Template.
- Use the Trigger Check Box to trigger actions when assigned hosts do not connect within the configured time span.
- Use the On Host Not Connecting Drop-Down to assign the actions to fire when assigned hosts do not connect within the configured time span.
Troubleshooting
If the Agent does not appear to be connecting or processing templates you can view the Agent's verbose output log for detailed information. The log file is located in the following directory on each remotely managed host:
On Windows the location is:
C:\ProgramData\Corner Bowl\Server Manager Agent\agent.log
On Linux the location is:
/var/log/corner-bowl/agent.log