How To Download Azure AD Audit Logs and Monitor Sign-In Events
In this article I am going to show you how to schedule Azure Active Directory Audit Log entry downloads, save the downloaded log entries to an on-premise database, get notified when any user fails to login 3 times within 5 minutes then, finally, send an email notification that includes the user's name in the email subject with Corner Bowl Server Manager.
Table of Contents
- How to Configure your Azure Portal for Remote Access
- How to Schedule Azure AD Audit Log Downloads
- How to Create a Failed Logon Filter
- How to Configure the Azure AD Sign-Ins Failed Logon Monitor
- How to Configure an Email Notification to Include the User's Name
- Testing the Azure AD Audit Log Failed Logon Monitor
How to Configure your Azure Portal for Remote Access
Before Server Manager can monitor Azure Active Directory Audit Logs the target Azure Portal must be configured to allow the log entries to be downloaded by Server Manager.
- Open your Internet Browser then navigate to portal.azure.com.
- Once logged in, select Azure Active Directory.
- Next, click App registrations, then New registration.
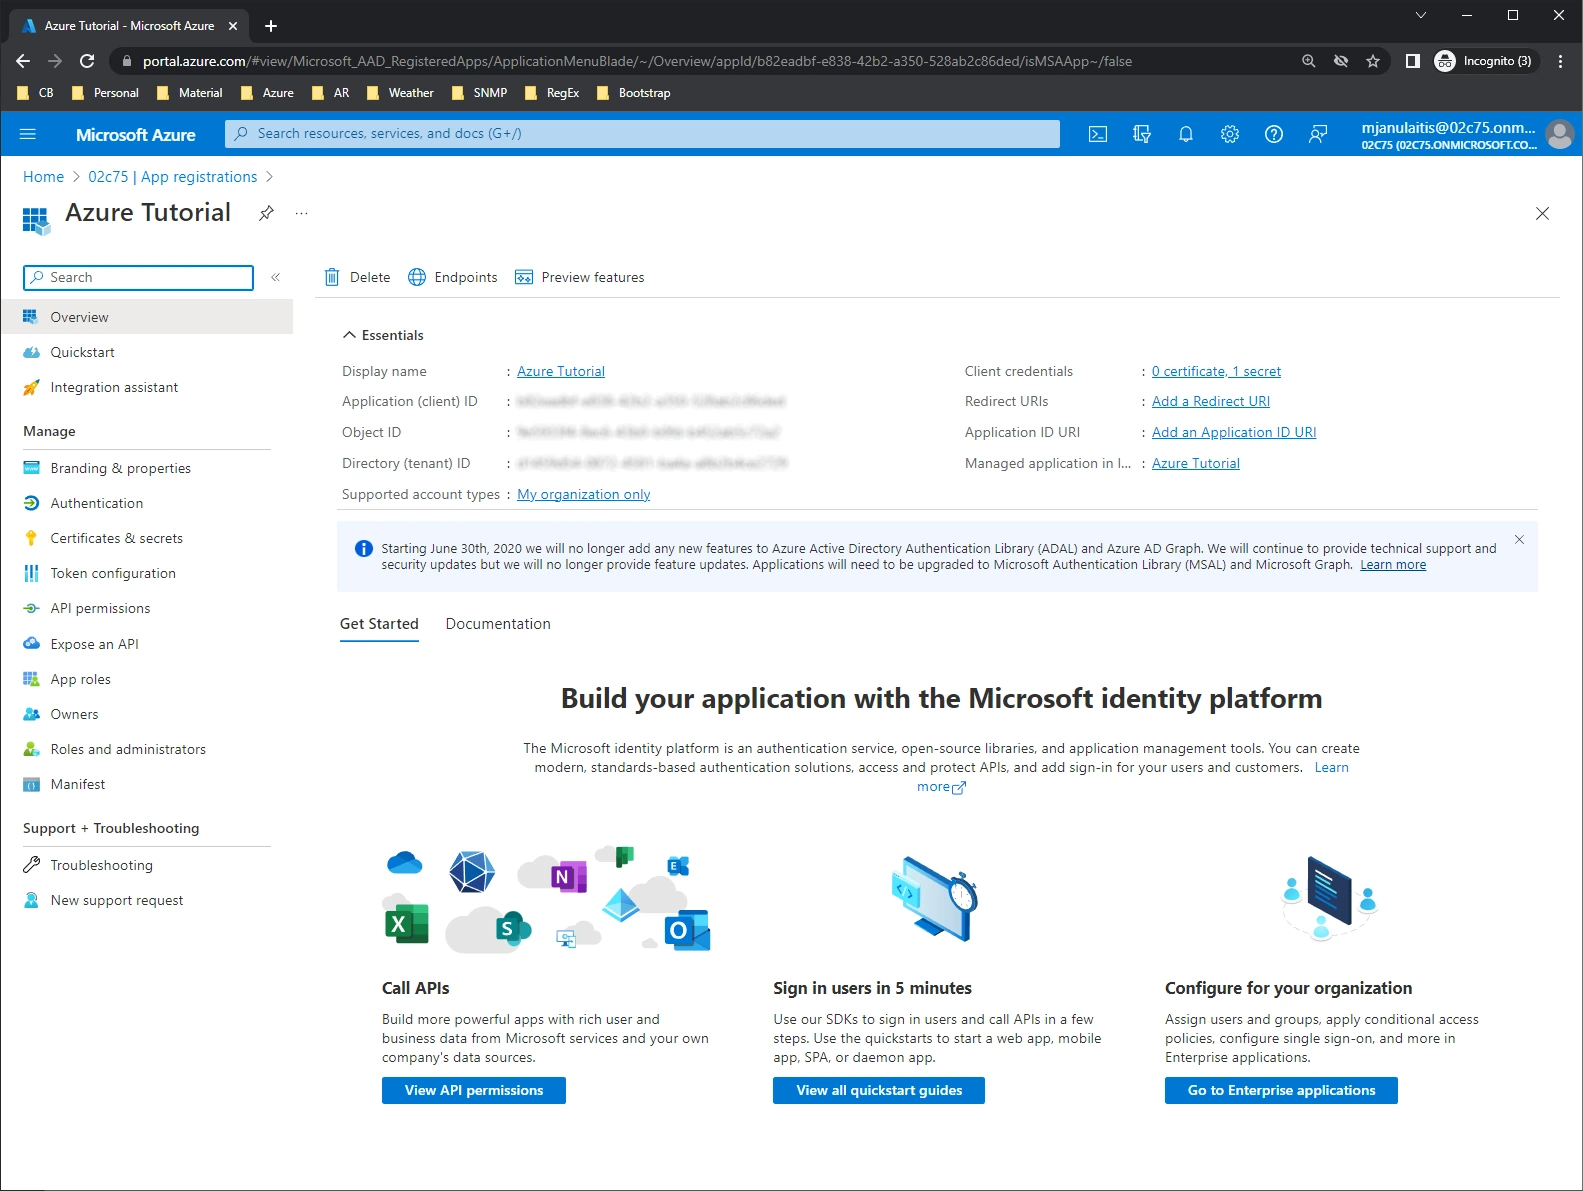
- Specify a friendly name then click Register. The App Registration Overview displays.
-
Copy the Application (client) ID and Directory (tenant) ID then paste to a text editor for later use.
 Azure App Registration Overview
 -
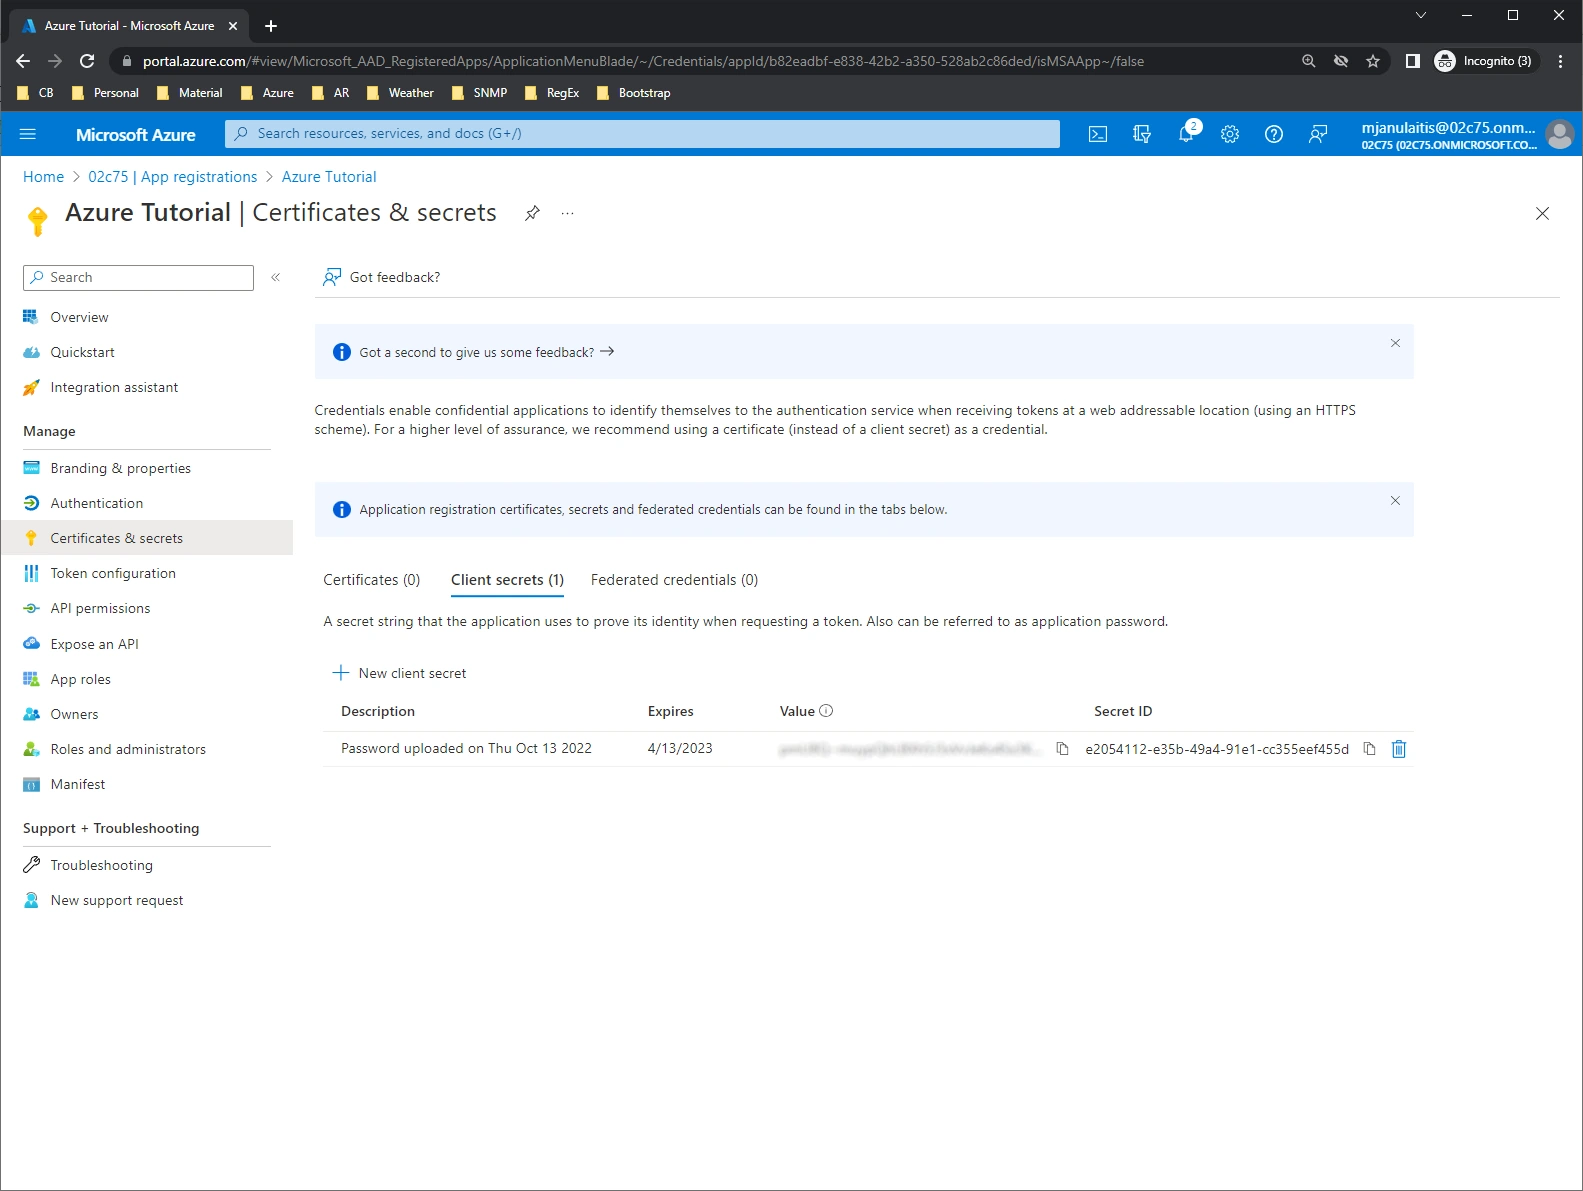
Next, click Certificates and secrets, then New Client Secret, then Add. Copy the secret then paste to a text editor for later use.
 Azure App Registration Client Secret
 -
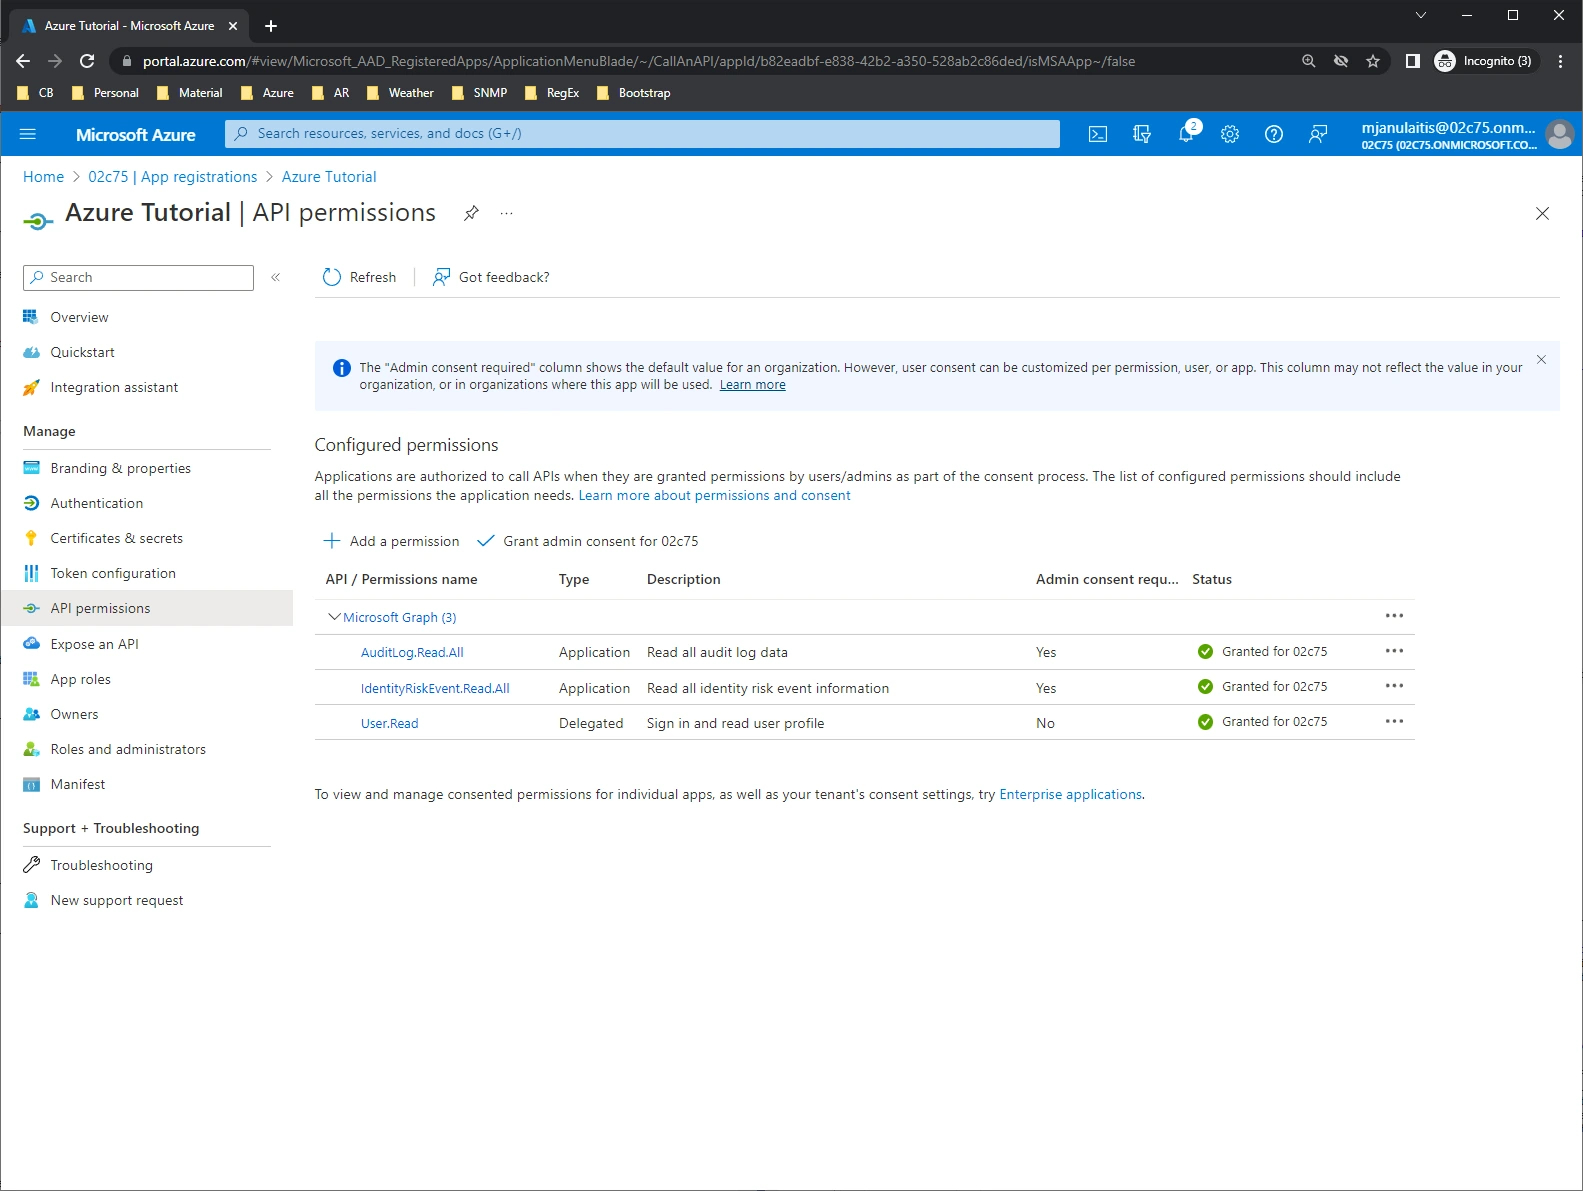
Next, click API permissions. Grant the following additional Microsoft Graph/Application permissions:
- AuditLog.Read.All
- IdentityRiskEvent.Read.All
-
Finally, click Grant admin consent.
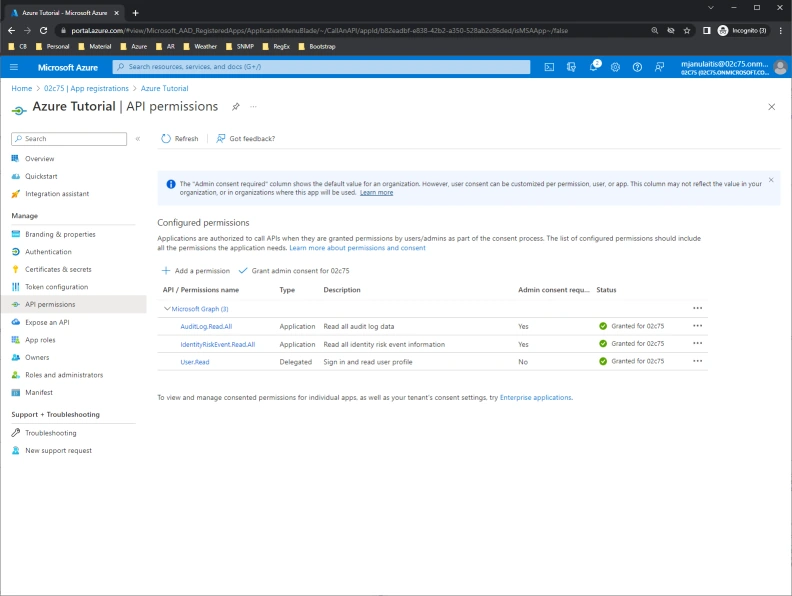 Azure App Registration API Permissions
How to Schedule Azure AD Audit Log Downloads
Next, we need to download the latest entries so we can create a Failed Logon Monitor that is based off of a already existing failed logon log entry.
- From the Menu Bar, select File | New. The Create New Object View displays.
- From the Create New Object view, expand Template | Log Management then select Log Consolidation. The New Log Consolidation Template Properties View displays.
- From the New Log Consolidation Template Properties View, click the Sub type drop-down then select Azure AD Audit Log.
-
Use the General Tab to specify a unique name and execution schedule.
NoteNotice the name includes all three standard logs, Audit, SignIns and Identity Risk. If you de-select a log, you can press the Auto-Generate Name
 button to automatically update the template name.
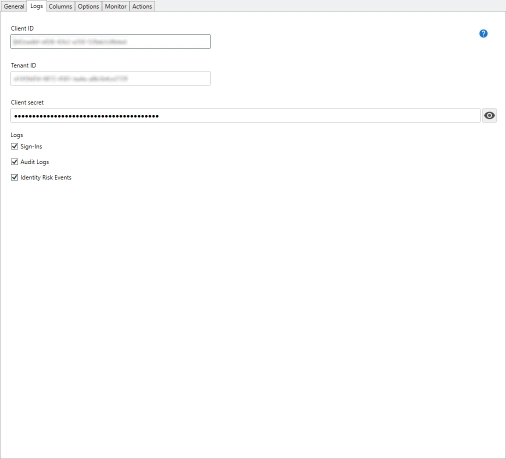
- Next, select the Logs Tab then paste the Azure Client ID, Tenant ID and Client Secret you previously saved to your text editor into the corresponding text boxes.
-
Click Close, then when prompted, save your changes.
 Azure AD Audit Log Consolidation Properties
 - Back in the Explorer View, you will now find an Azure Active Directory host under the root Hosts node.
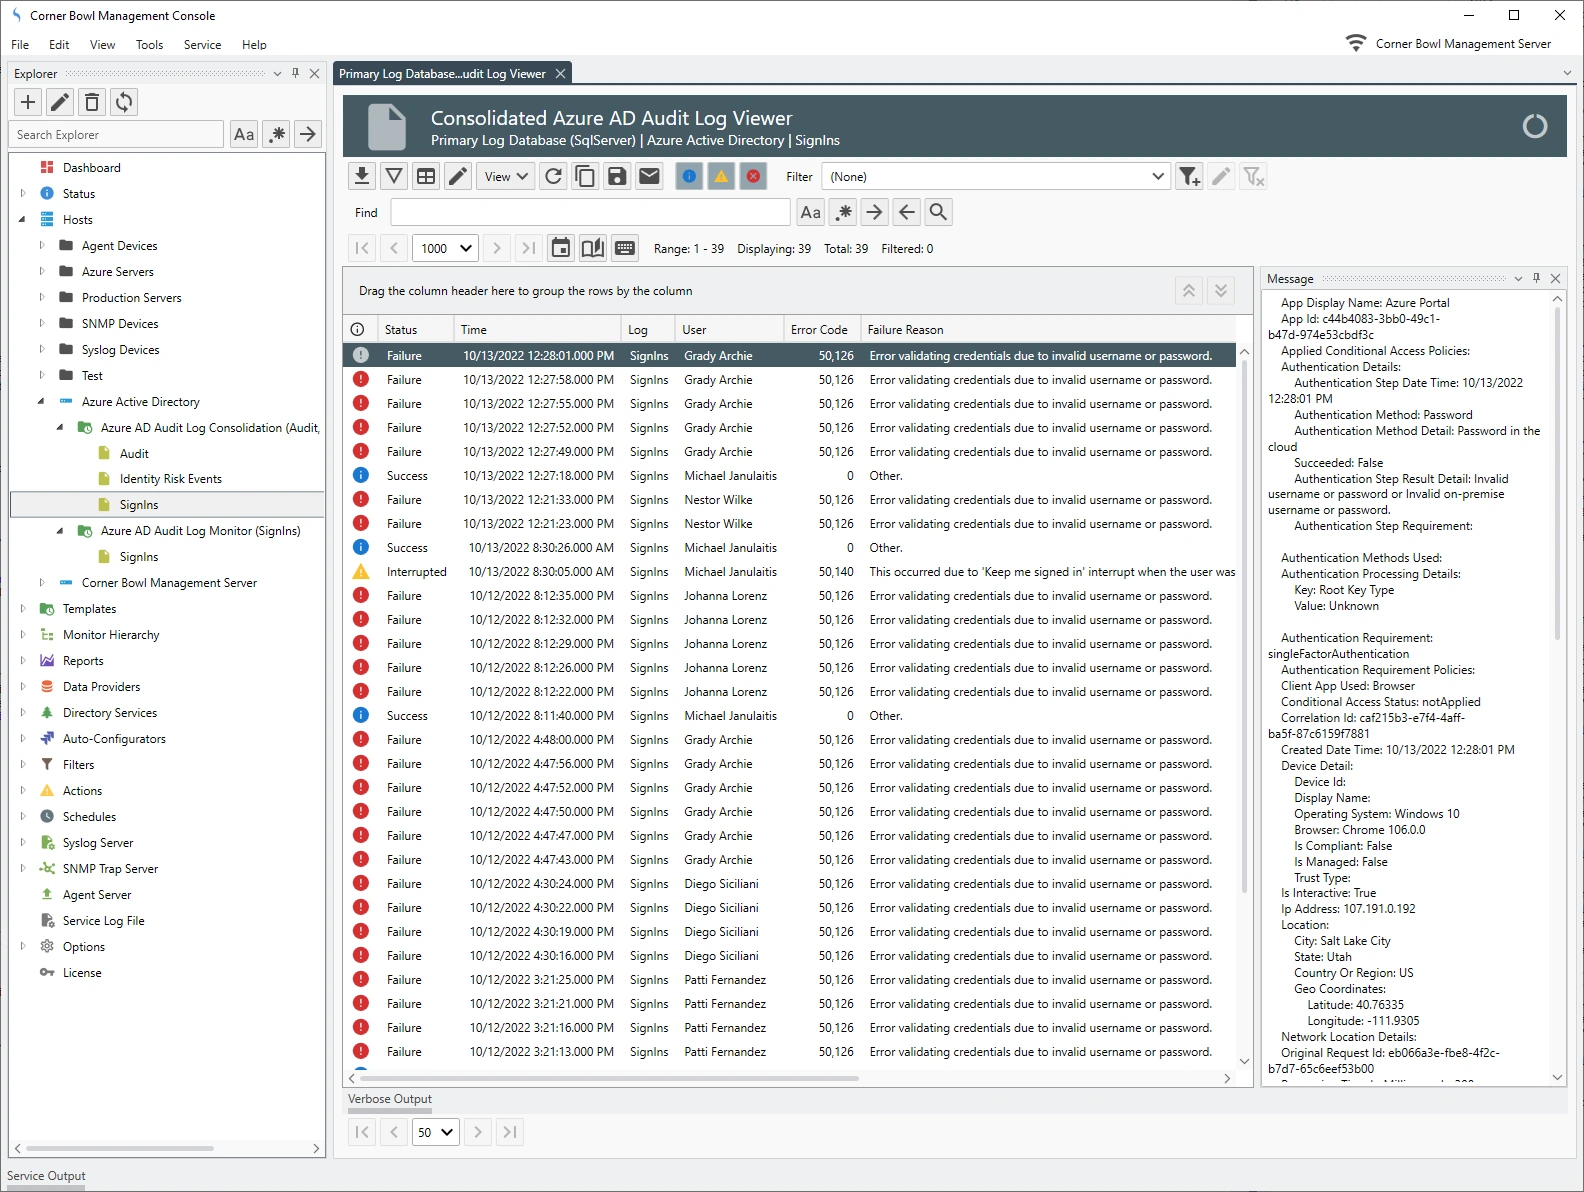
- Expand the Azure Active Directory node, then find the new template we just created. Right click on the template then select Execute Verbose. The Monitor Status View displays.
- From the Monitor Status View, notice the log entries are downloaded then saved to the log database (e.g. SQL Server, MySQL or SQLite).
-
Select the Data Properties Tab, then click the View
 button. The Select Log View Options Dialog displays. Leave the defaults then click OK. The Consolidated Azure AD Audit Log View displays.
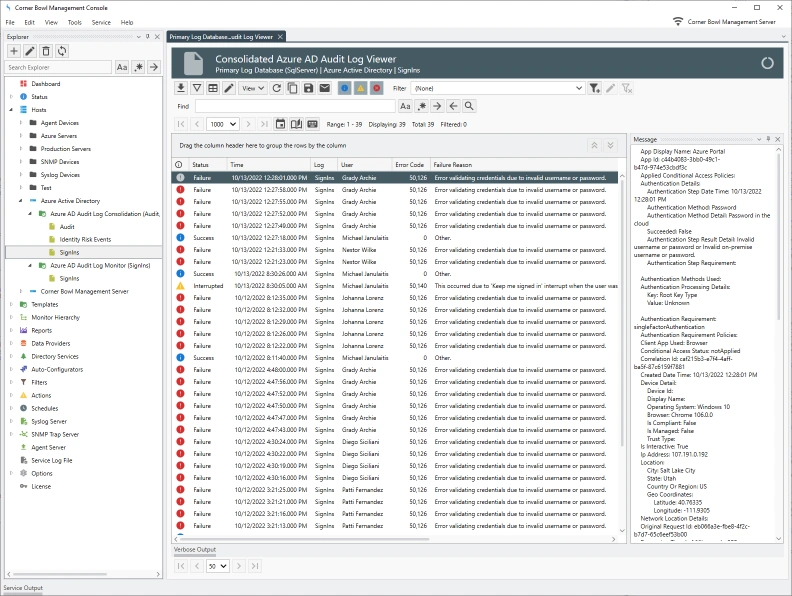 Consolidated Azure Active Directory Audit Log Viewer
 - Next, we need to create a filter to target the failed logon events.
How to Create a Failed Logon Filter
- Continuing from the section above, find a failed logon entry then, right click and select Filter Selected Entries. The Filter Selected Entries Dialog displays.
- From the Filter Selected Entries Dialog, specify a unique name, for example, Azure AD Failed Logons, then click OK. The Filter Properties View displays.
- From the Filter Properties View, remove all criteria except ERROR_CODE.
-
Click Close, then when prompted, save your changes.
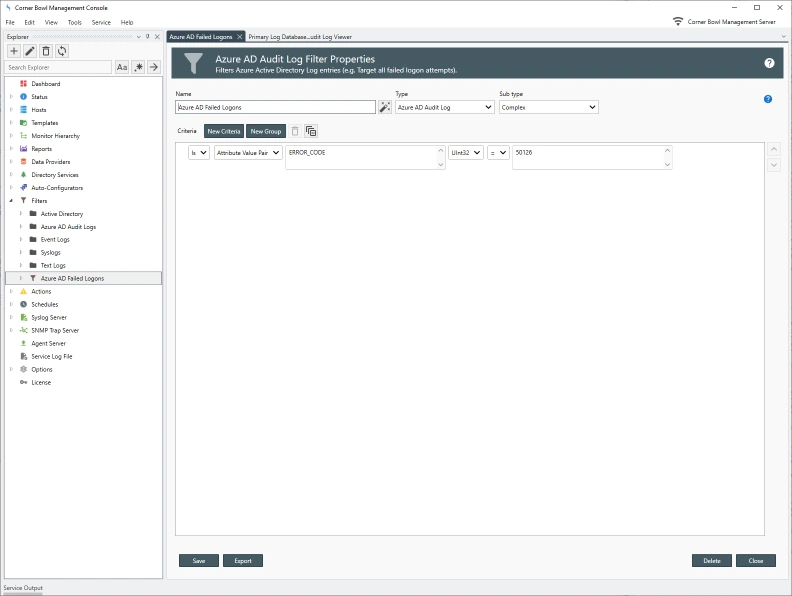 Failed Logon Filter Properties
 - Notice, the new filter is automatically applied to the Consolidated Azure AD Audit Log Viewer.

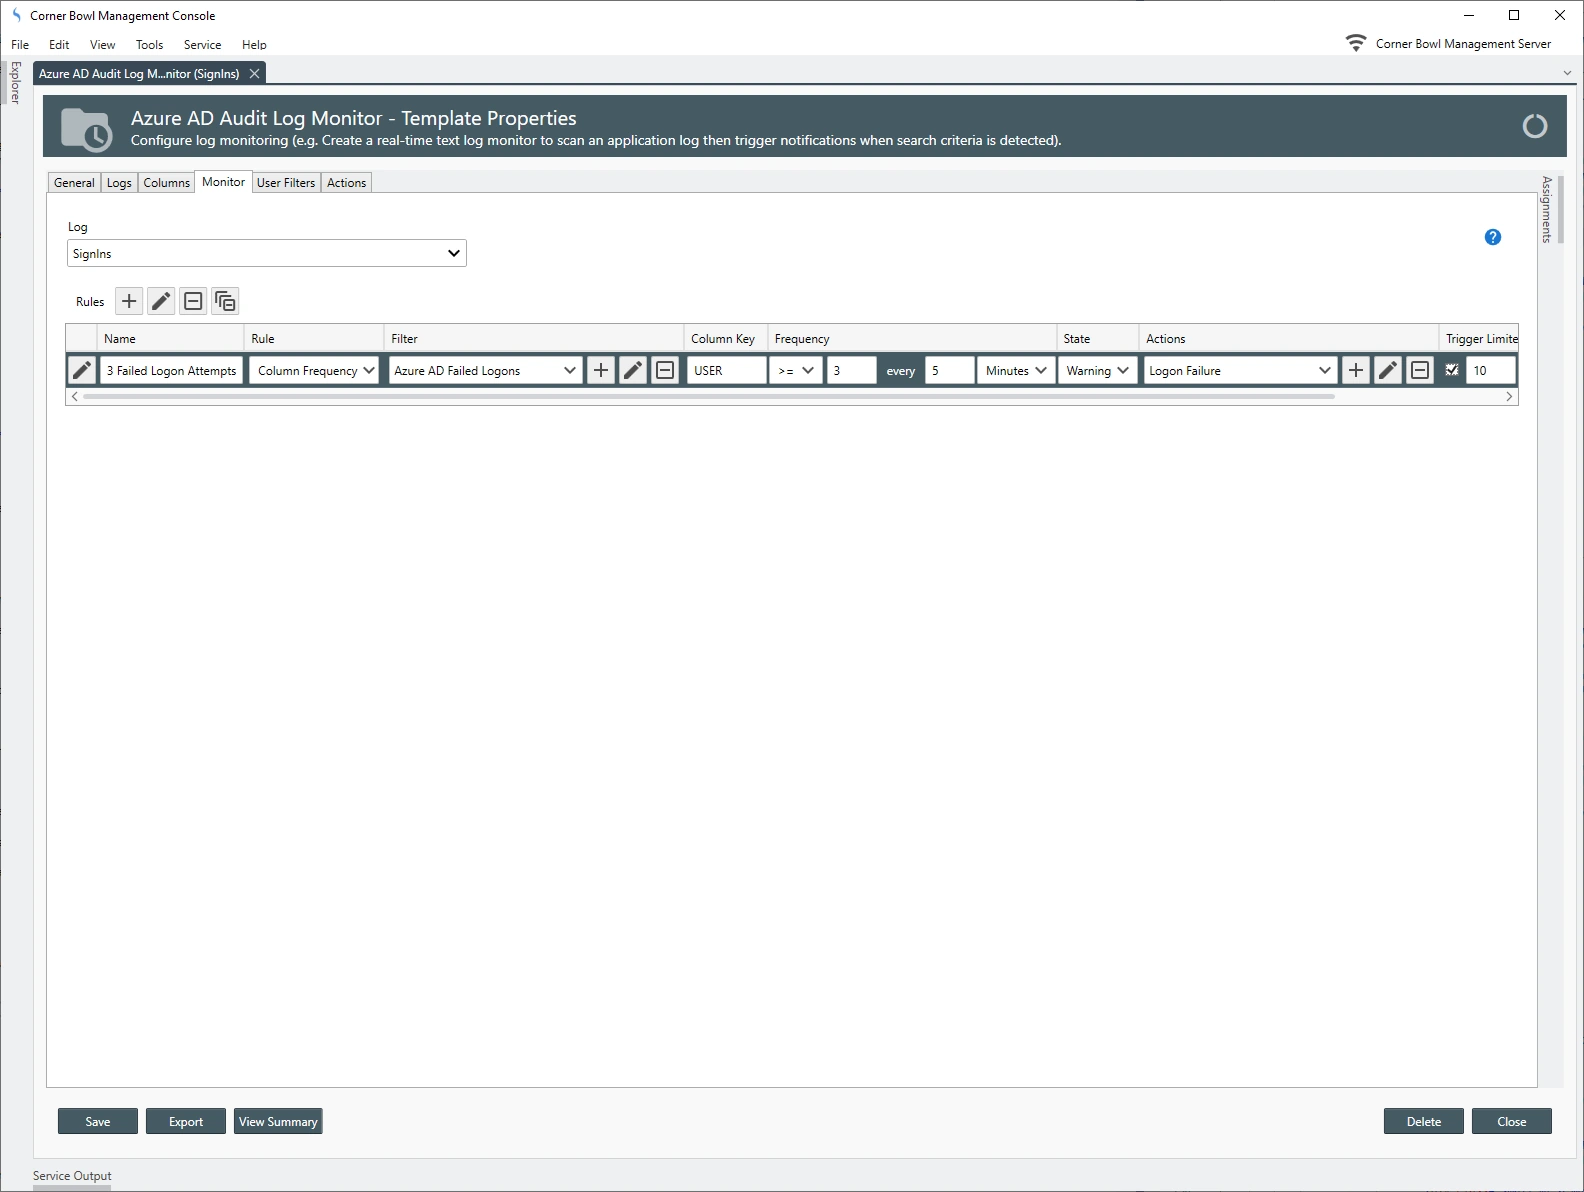
How to Configure the Azure AD Sign-Ins Failed Logon Monitor
To limit the log entries to failed logon events, we need to create and apply a Failed Logon Filter to the log monitor rule.
- Continuing from the section above, right click on the same log entry then select New Azure AD Audit Log Template. The New Log Monitor Template Properties View displays.
- From the New Log monitor Template Properties View, select the Logs Tab then notice the Client ID, Tenant ID and Client secret have already been pre-populated. Also, the Audit Logs and Identity Risk Events are un-checked.
- Select the Columns Tab.
-
First, let's disable some several columns from the monitor so the triggered notifications only include the information we are interested in.
From the Columns Tab, un-check the CORRELATION_ID and MESSAGE columns.
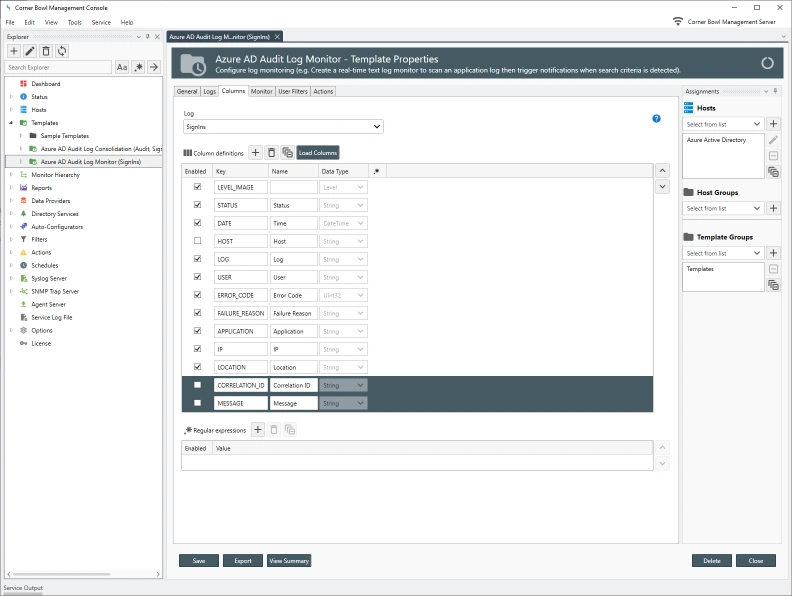 Azure Active Directory Failed Logon Monitor Columns
 - Next, find the USER column then copy the key value to the clipboard.
- Next, select the Monitor Tab.
- From the Rules control, click the Add
 button. A new line item is added.
 - From the Name column specify a friendly rule name, for example, 3 Failed Logon Attempts.
- From the Rule drop-down, select Column Frequency.
- From the Filter drop-down, select the new filter we just created.
- From the Column Key text box, paste the USER tag.
- Use the Frequency column to specify the frequency trigger, for example, >= 3 times every 5 minutes.
- Use the State drop-down to configure the monitor to display a warning or critical state when triggered.
- Use the Actions drop-down to select the action to fire. Since we want to include the user's name in the subject, we need to create a new email Action (see below). Once you have created your new action, assign the action to your rule.
- Use the Trigger Limiter controls to limit the number of notifications over a period of time, for example 10 email notifications every hour.
-
Finally, click Close, then when prompted, click Yes to save your changes.
 Failed Logon Log Monitor Rule
How to Configure an Email Notification to Include the User's Name
Server Manager enables users to include column values in various action content by placing the column's KEY value wrapped with {} characters.
- To create a new email action that includes the user's name that failed to login, click the Add button. The New Action View displays.
- From the New Action View, use the Name text box to specify a unique name, for example Logon Failure.
- From the Type drop-down select Email.
- Use the Recipients drop-down to select the various email addresses to send the notification.
-
Change the subject line to include the name of the log monitor rule and the user's name. To do that specify the following variable tags, for example:
{MONITOR_RULE_NAME} User: {USER}
-
Finally, click Close, then when prompted, click Yes to save your changes.
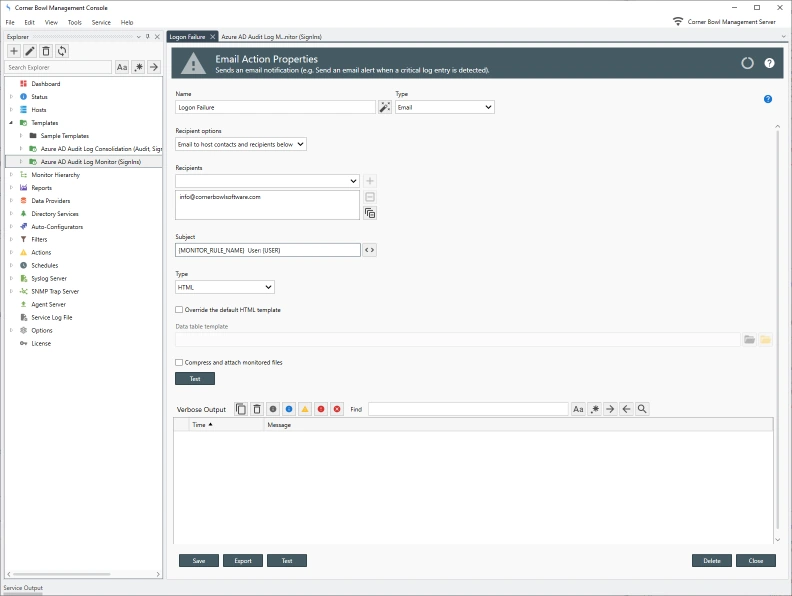 Failed Logon Email Notification Properties
Testing the Azure AD Audit Log Failed Logon Monitor
- To test the failed logon monitor we just created, open an Internet Browser, navigate to portal.azure.com, then attempt to login using any valid account but with the wrong password at least 3 times.
- Azure AD takes several minutes to publish the log entries. While you are waiting, find the new Azure AD Failed Logon Monitor Template under the Azure Active Directory Host then right click and select Explore. The Monitor Status View displays.
-
Once the monitor finally downloads the entries,
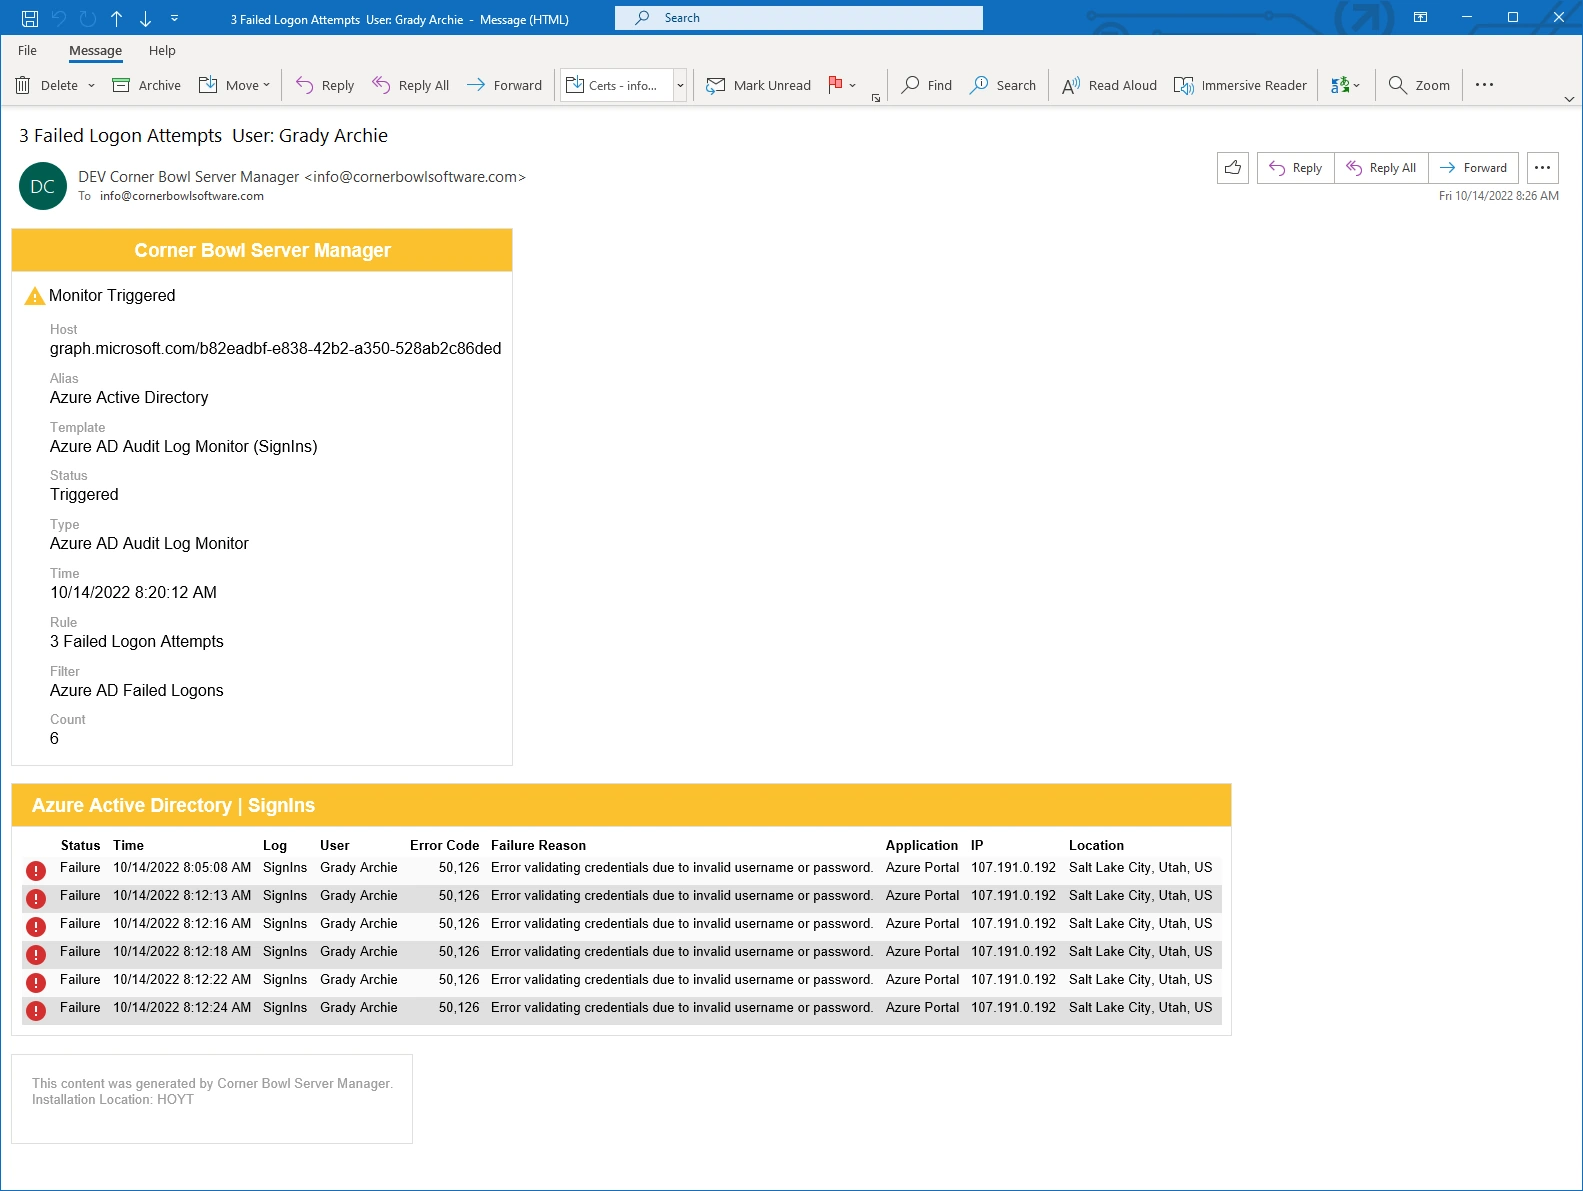
- The Monitor Status View displays the last triggered message.
- The email notification, includes the log monitor rule name in the subject along with the user's name that failed to login. The metadata also includes the log monitor rule name and the number of failed logon attempts.
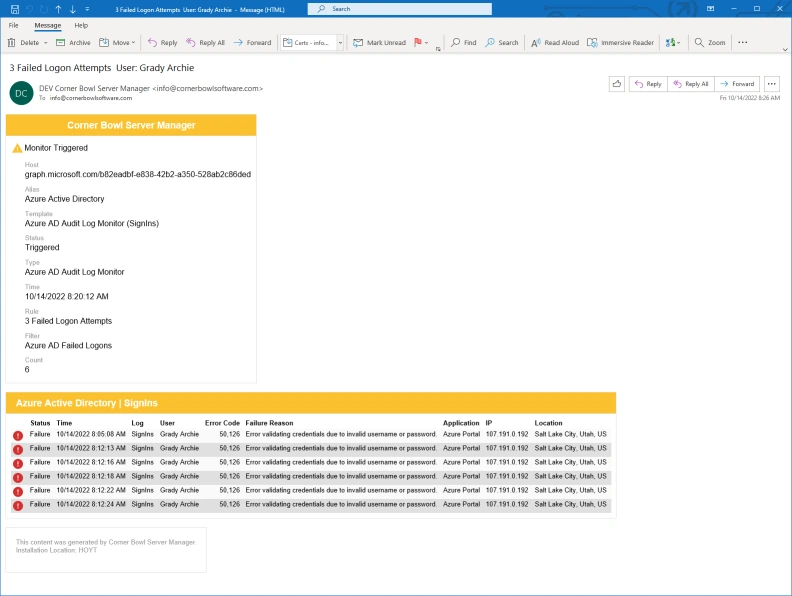 Azure Active Directory Failed Logon Email Notification
 - That's Azure Active Directory Log Consolidation and Failed Logon Monitoring with Corner Bowl Server Manager.