Monitoring SNMP Traps and Variables
Overview
If you are not familiar with SNMP, devices such as switches and other network hardware provide device information, status and critical alerts through SNMP. Device information and status is retrieved through SNMP Gets while critical alerts are fired as SNMP Traps. Corner Bowl Event Log Manager enables you to create and assign filters to SNMP Get Monitors so you can get alerted when a variable is set to a specific value or exceeds a threshold. Corner Bowl Event Log Manager also includes an SNMP Trap Server enabling you receive both local and remote SNMP Traps for both consolidation and notification. Finally, using Microsoft's built-in SNMP service, templates can be configured to trigger an SNMP Trap when the template triggers, errors or recovers.
Licensing
To access the SNMP functionality within Corner Bowl Event Log Manager you will need either a Corner Bowl Server Manager license or a Corner Bowl Internet Server Monitor license.
Configuring Microsoft's SNMP Service
Ok let's get started. The first step is to install and configure Microsoft's SNMP Service.
- On Windows 10 Workstation go to Apps & Features, select Optional Features then Add a feature.
- Type SNMP then select Simple Network Management Protocol.
-
Once installed SNMP will be displayed in your Optional features.
 Windows SNMP Feature
 - Next, open the services control panel.
- From the Services Control Panel double-click on SNMP Service.
- Select the Agent tab, then verify Physical and Applications are checked.
-
Select the Traps tab then under Community Names add public with a trap destination of 127.0.0.1.
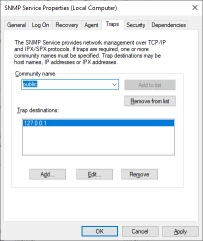 Windows SNMP Service Traps Configuration
 -
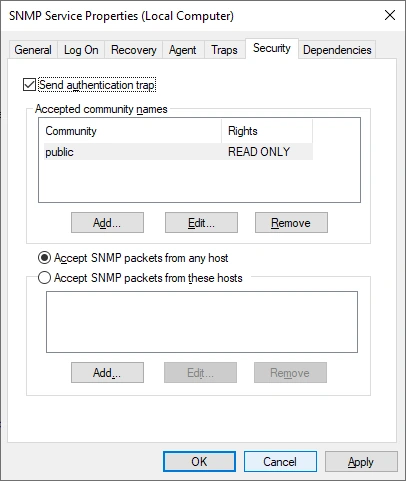
Select the Security tab, then add the public community with read access. Next check the option to Accept SNMP packets from any host.
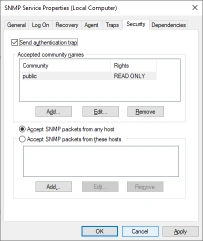 Windows SNMP Service Security Configuration
 - This configuration enables Corner Bowl to send and receive traps generated from local SNMP agents.


Configuring an SNMP device
Next verify the service is configured and running as expected.
- From the Corner Bowl Console select File New Computers Devices and Endpoints
- Specify the IP address of the target device. For this tutorial I'm using my localhost so the host has already been added. If I right click on my localhost and select Host Properties the Host Properties view displays.
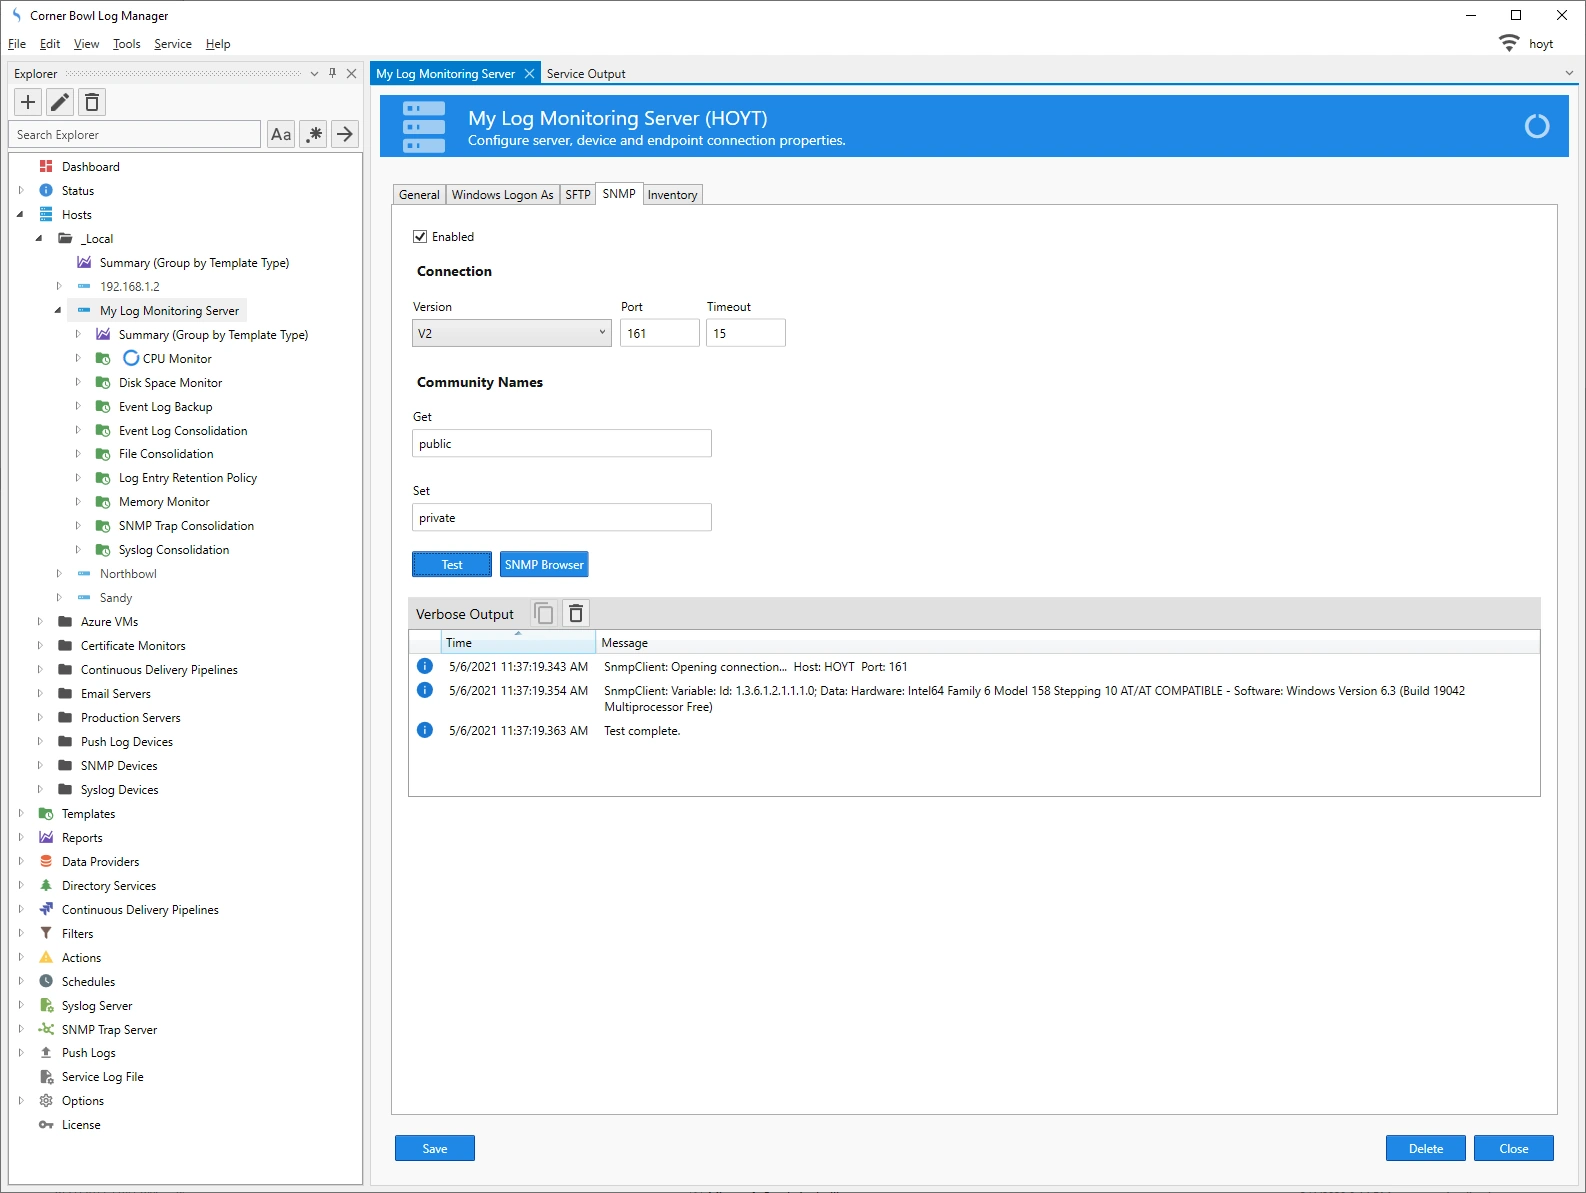
- Select the SNMP tab.
- Check Enabled then click the Test button.
-
If the SNMP Service was configured correctly, the Verbose Output should show the processor detail.
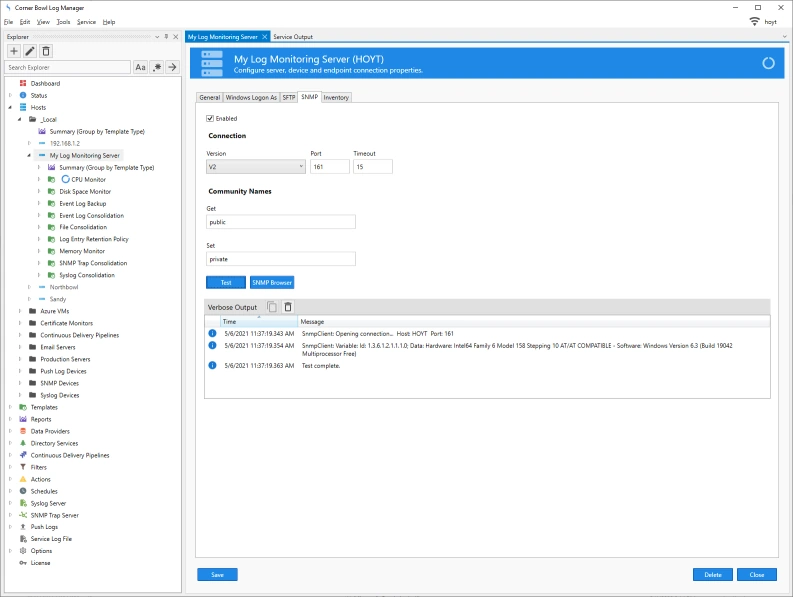 SNMP Device Configuration
Browsing the SNMP Variable Tree
- From the Explorer view locate your target SNMP device, right click and select Host Properties.
- Select the SNMP tab then, if not already enabled, enable SNMP.
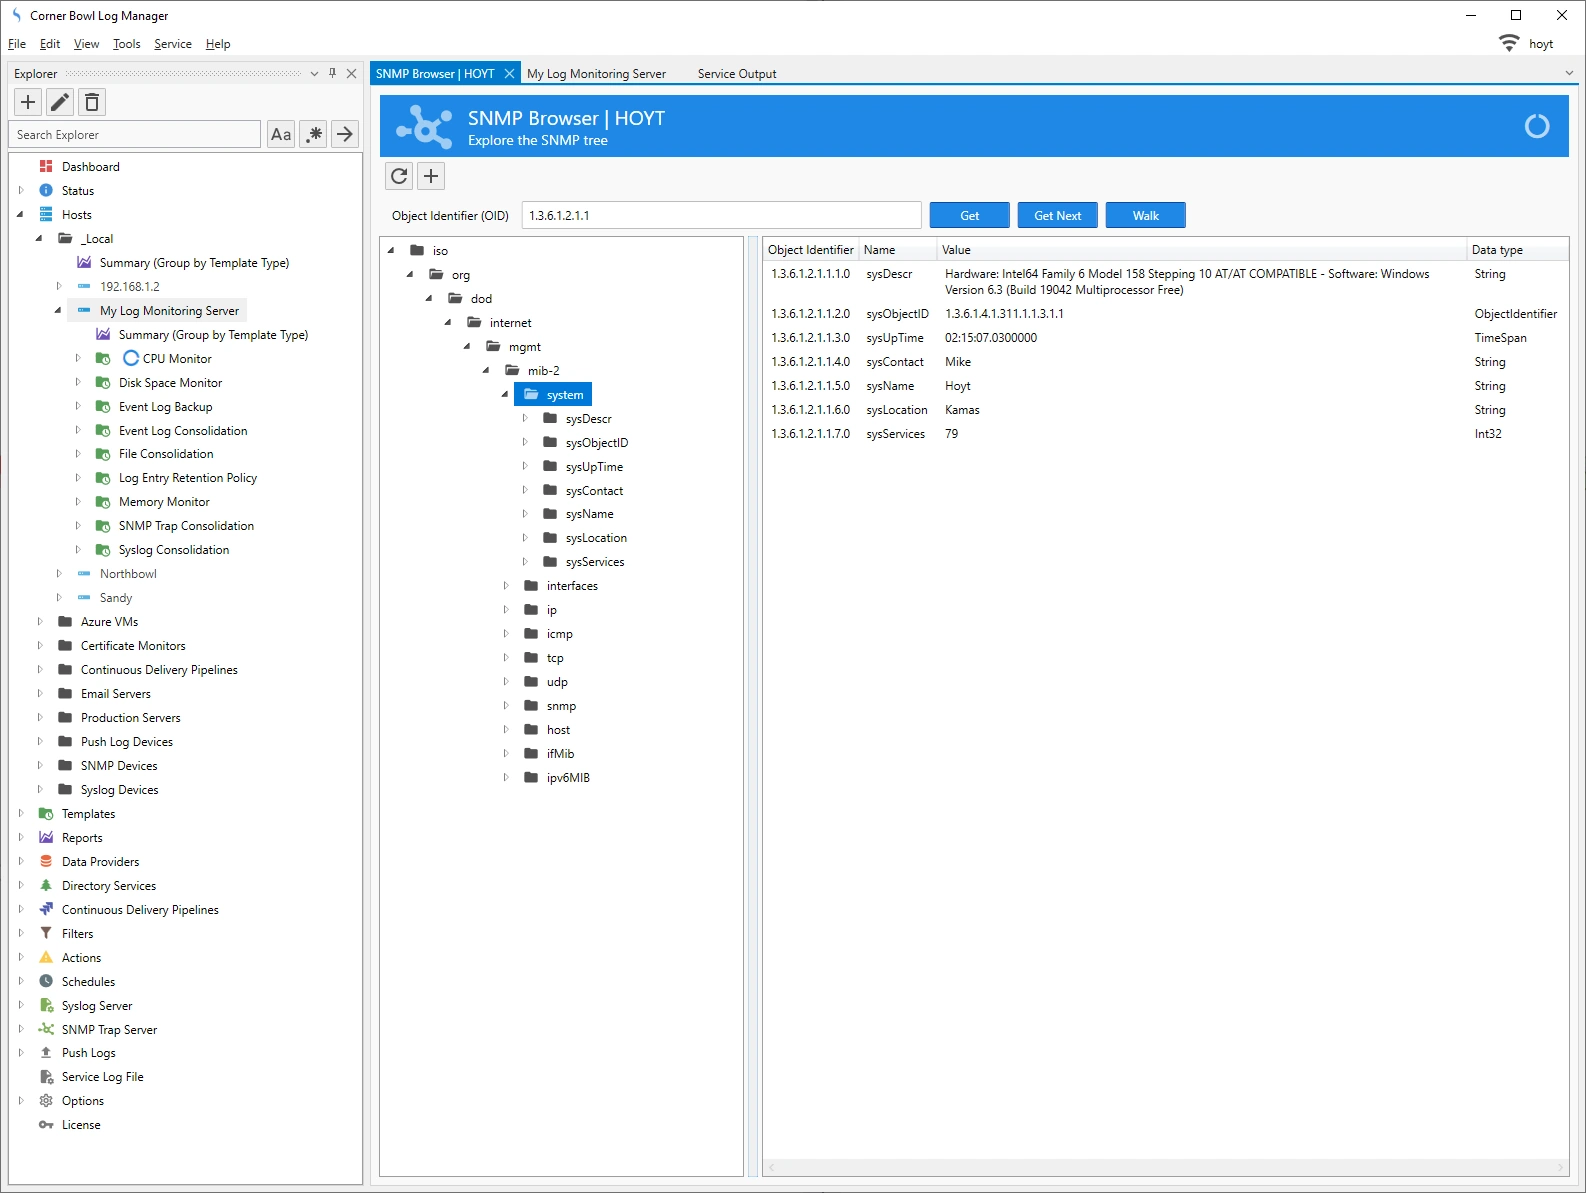
- Click the SNMP Browser Button. The SNMP Browser displays and the tree is walked to the first returned value.
- You can use this view to navigate to target variables for SNMP Get Monitoring.
-
To walk the SNMP tree, select the target variable then click the Walk button.
 SNMP Browser
SNMP Trap Retention
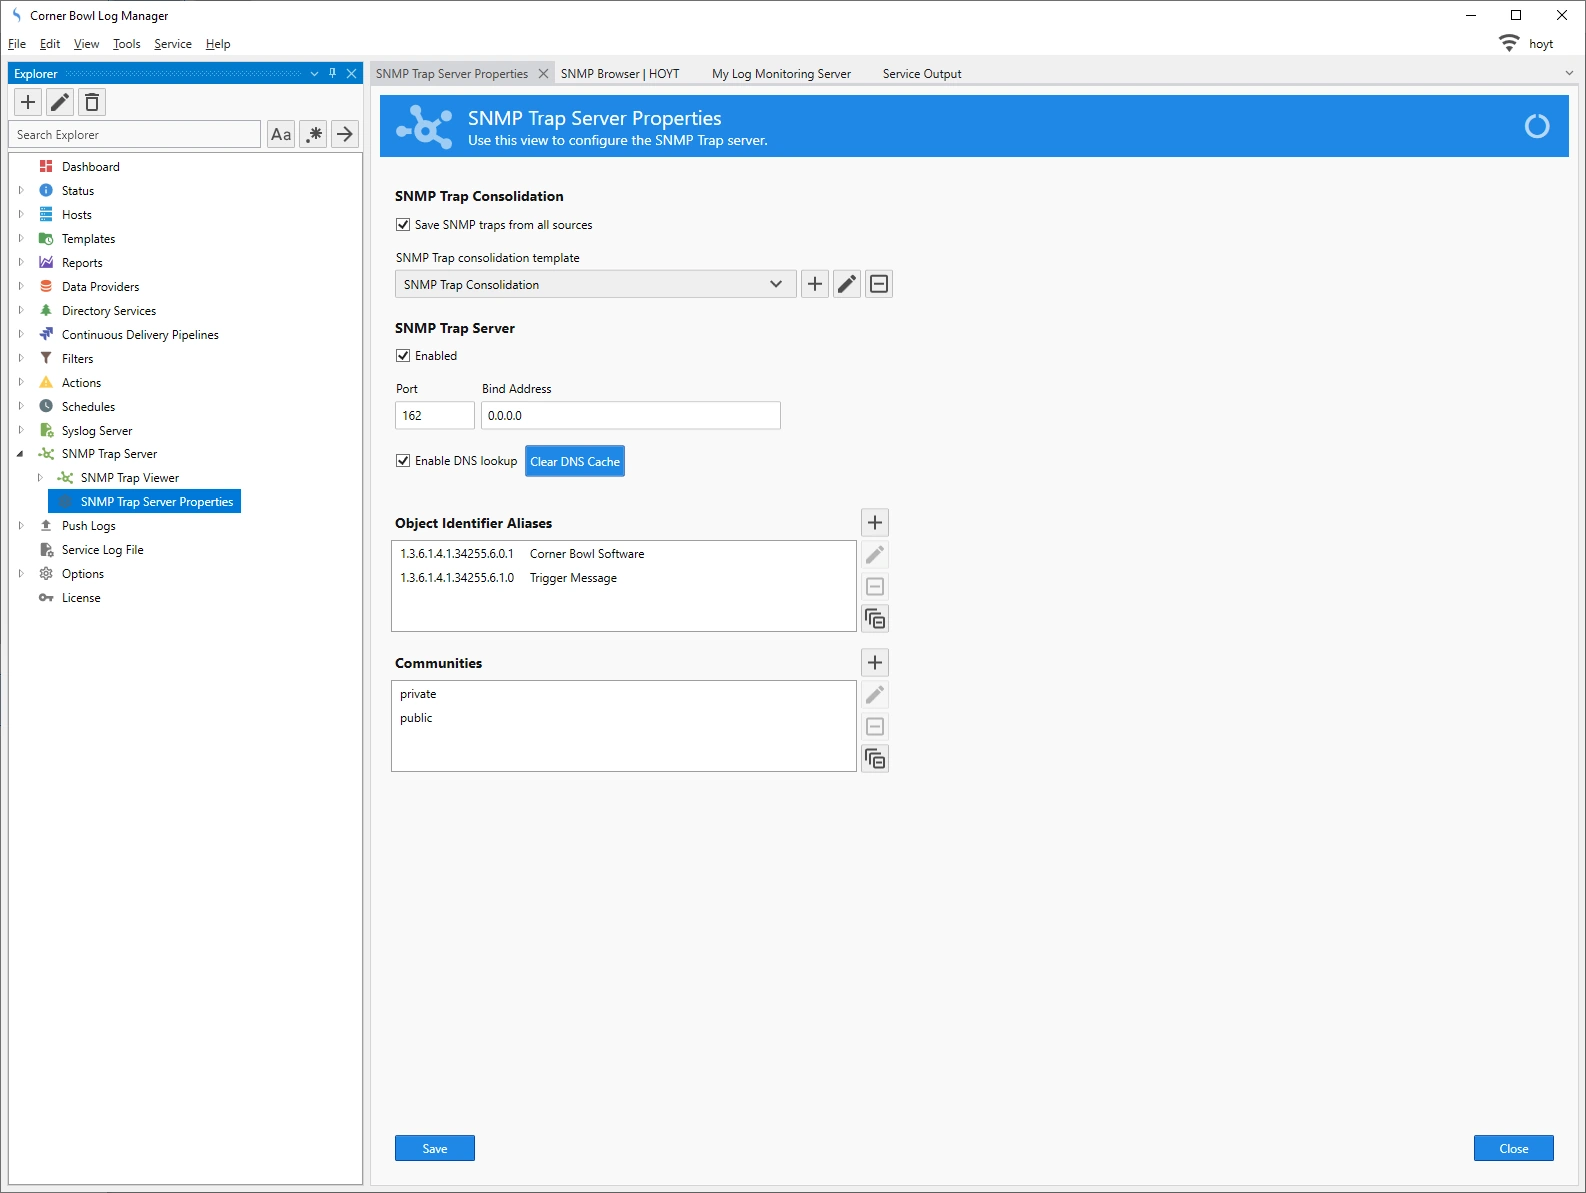
- From the Explorer view expand the SNMP Trap Server node then select SNMP Trap Server Properties.
- The SNMP Trap Server Properties view displays.
- By default traps received from any host are automatically saved using the pre-installed SNMP Trap Consolidation template. Use this template to configure the SNMP Trap retention policy.
- If you do not want to save traps from all sources, you can instead manually assign the SNMP Trap Consolidation template to each target host and device.
- By default each host that sends traps are looked up in DNS so traps can be saved using the hostname rather than the IP. If DNS has no hostname associated with the IP address the traps are saved using the IP address.
- Use the Object Identifier Aliases list to associate friendly names to OID values.
- Use the Communities list to add the communities you would like to listen for.
-
Save any changes before continuing.
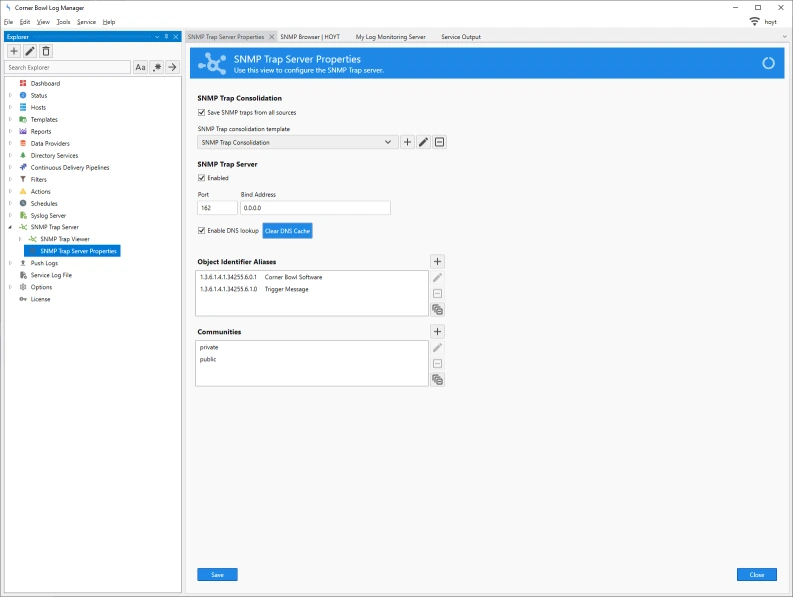 SNMP Trap Retention Configuration
 - From the Explorer view select SNMP Trap Viewer.
- The real-time SNMP Trap viewer displays.
- Event Log Manager includes an SNMP Trap action so that's what we are going to use to test the traps. From the Explorer view expand Actions / SNMP Traps then right click on SNMP Trap and select Send test SNMP Trap.
-
Back in the Real-Time SNMP Trap viewer and you should see the SNMP Trap with a trap name of Corner Bowl Software, variable name of Trigger Message and value of Test message.
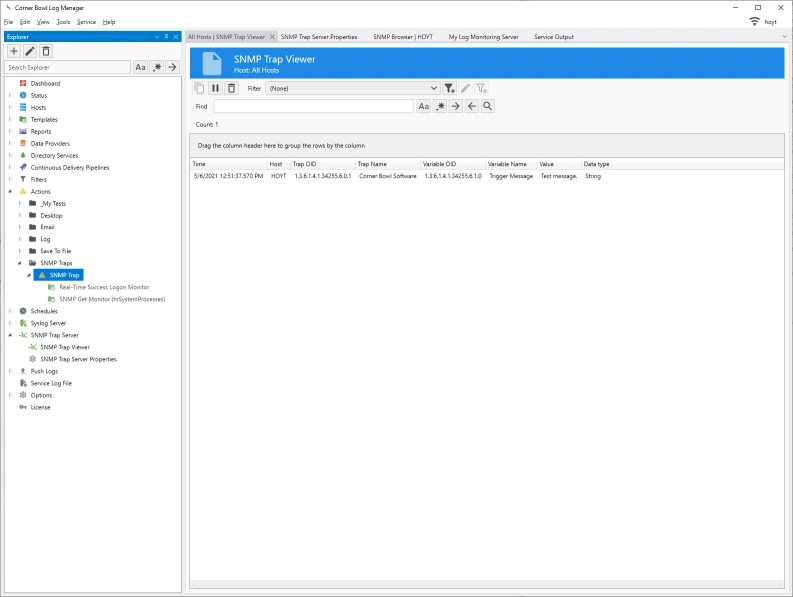 Real-Time SNMP Trap Viewer
 - To view the SNMP Trap history, from the Explorer view expand Data Providers / Primary Log Repository then expand the localhost name.
- If the trap was properly saved you should see an SNMP Traps node.
- Right click on the node and select View.
- The Select Log View Options dialog displays. You have the option to apply a display filter, page traps by the number of traps or days and finally you can auto-advance to a specific date.
-
The Consolidated SNMP Trap Viewer or history viewer displays and you should see the trap that you just fired.
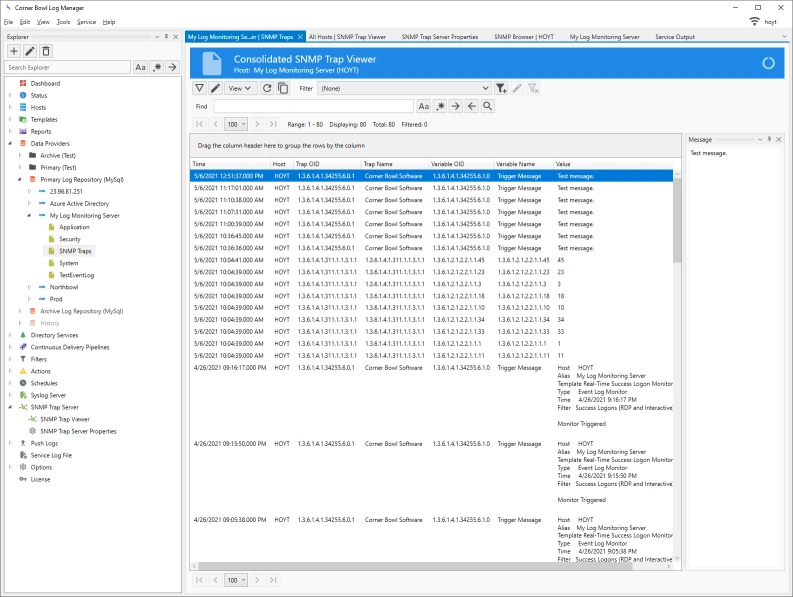 SNMP Trap History Viewer


SNMP Trap Monitoring
- To monitor an SNMP Trap, from the viewer, right click on the trap and select New SNMP Trap Monitor Template.
- The New SNMP Trap Monitor view displays.
- Notice the schedule is set to Real-Time because we are listening for traps.
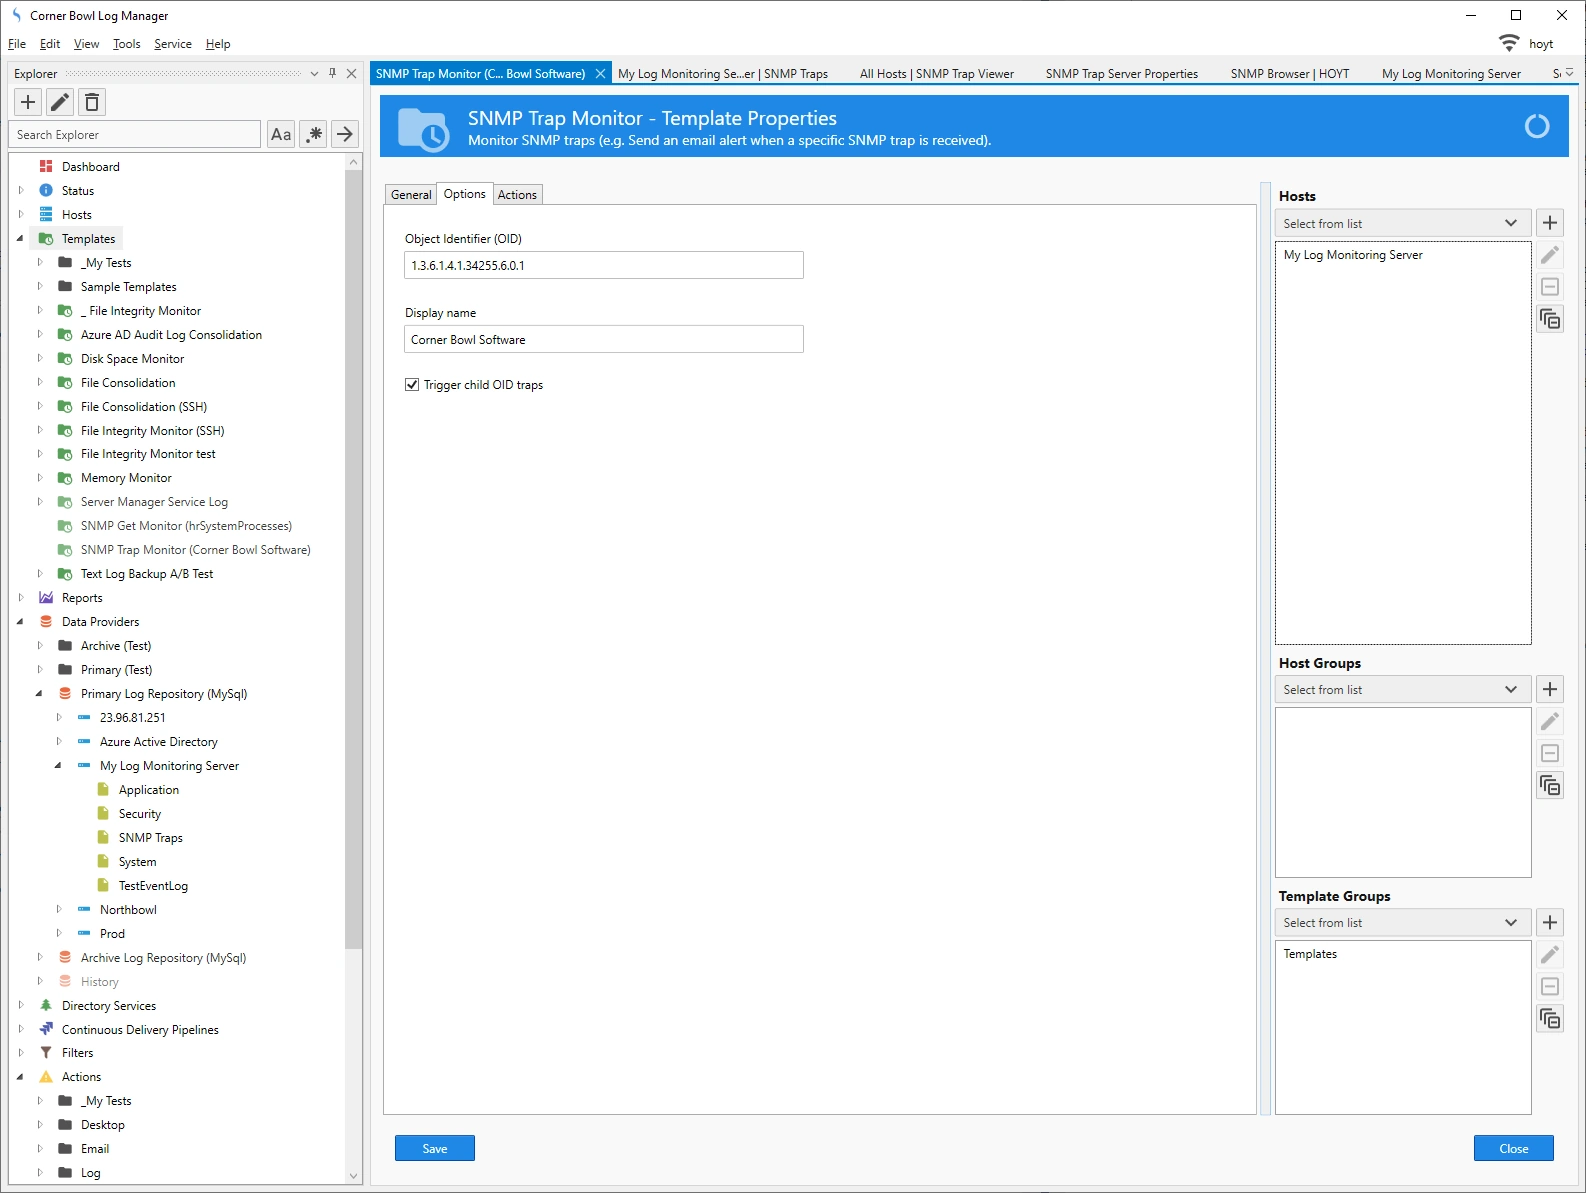
- Select the Options tab.
- Notice the Object Identifier and Display name are pre-filled with values of the trap we just selected.
-
Check the Trigger child OID traps options to trigger this template when any child trap is received.
 SNMP Trap Monitor Configuration
 - Select the Actions tab.
- Use the On Trigger drop down to select the action you would like to fire when the target trap is received.
SNMP Variable Monitoring
- From the Explorer view locate your target host or device, if not already enabled, enable SNMP and test.
- If the test was successful click the SNMP Browser button.
- Use the Walk button to walk the target leaf of the tree you are interested in.
- The New SNMP Get Monitor view displays.
- Use the General tab to specify the frequency to poll the value.
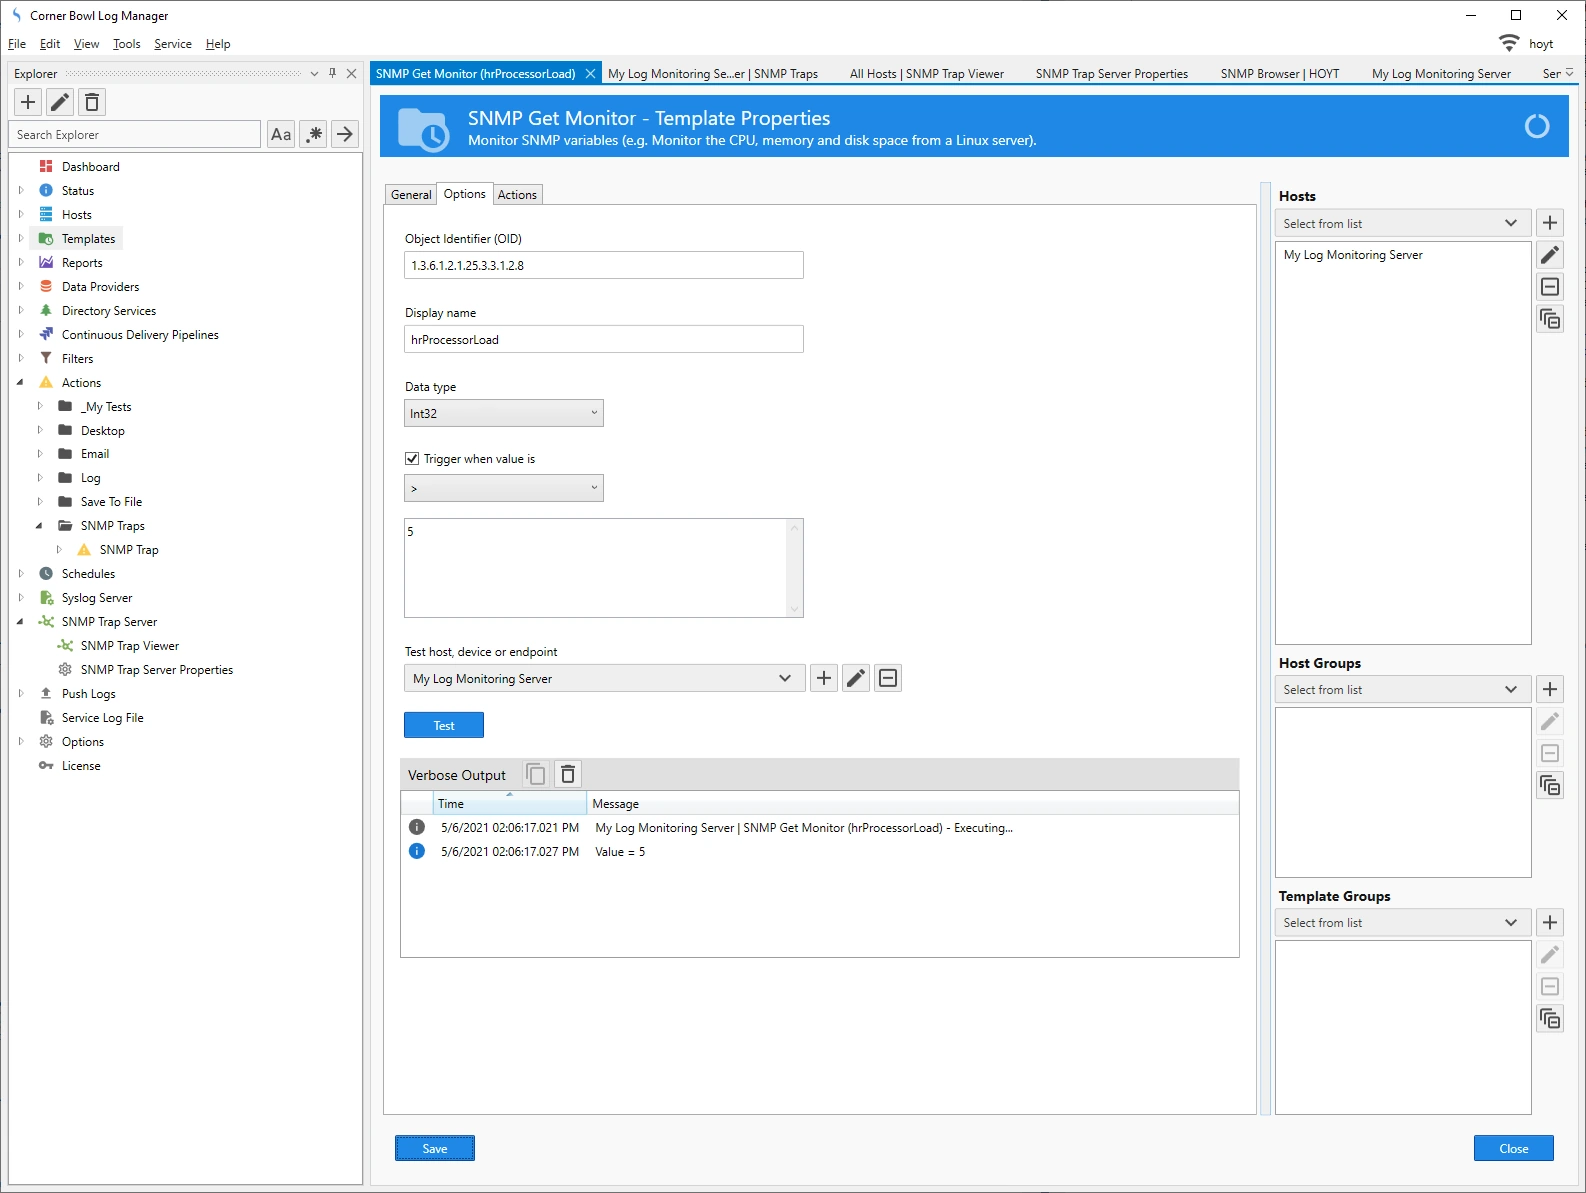
- Select the Options tab.
- Notice the Object Identifier and Display name are pre-filled with values of the trap we just selected.
- Also, the Data type is set to the correct value.
-
Use the trigger controls to set the criteria to trigger the alerts.
 SNMP Variable Monitor Configuration
 - Select the Actions tab.
- Use the On Trigger drop down to select the action you would like to fire when the trigger criteria is met.
Wrap-up
And that's SNMP with Corner Bowl. Thank you for reading I hope this has helped you better understand the SNMP capabilities of Corner Bowl Software.