Table of Contents
- Getting Started
- Agent-Based Management
- Common Tasks
- Data Providers
- Directory Services
- Auditing
- Hosts
- Templates
- Template Properties
- Batch Update Templates
- Assign Templates
- Log Management Templates
- SCAP Compliance Monitor
- Active Directory User Monitor Templates
- File and Directory Monitor Templates
- Windows Monitor Templates
- CPU Monitor Template
- Memory Monitor Template
- Disk Space Monitor Template
- Account Lockout Monitor Template
- Audit Policy Monitor Template
- Logon As Monitor Template
- Logon Monitor Template
- Performance Counter Monitor Template
- PowerShell Template
- Process Monitor Template
- RDP Session Monitor Template
- Registry Value Monitor Template
- Service Monitor Template
- SMART Disk Monitor Template
- System Security Monitor Template
- Windows Update Template
- WMI Query Template
- Task Scheduler Template
- Clock Synchronization Template
- Defragment NTFS Disks Template
- Network and Application Monitor Templates
- SSL Certificate Monitor Templates
- Database Templates
- Email Monitor Templates
- SNMP Monitor Templates
- Windows Accounts Templates
- Monitors
- Reports
- Auto-Configurators
- Filters
- Actions
- Schedules
- Environment Variables
- Options
- SNMP
- SSH Shell
- Syslog
- System Reset
- Shared Views
- Active Directory User and Group Filters
- Assign Actions
- Assign Azure Audit Logs
- Assign Consolidated Logs
- Assign Directories
- Assign Disks
- Assign Event Logs
- Assign Files
- Assign Services
- Assign Shares
- Auto-Config Host Assignment Properties
- Define CSV and W3C Log Entry Columns
- Define Log Entry Columns
- Define Log Entry Columns with Regular Expressions
- Executable Status
- Executable Timeline
- Explicitly Assigned Logs
- File Explorer
- General Executable Properties
- Report Columns
- Report Date/Time Ranges
- Report Security Event Log Filters
- Select Folder or File
- Target Files and Sub-Directories
- Command Line Interface
- Server Configuration
- Agent Configuration
- Troubleshooting
- Best Practices
- Terminology
Corner Bowl Server Manager
SIEM, IPS, Server Monitoring, Uptime Monitoring and Compliance Software
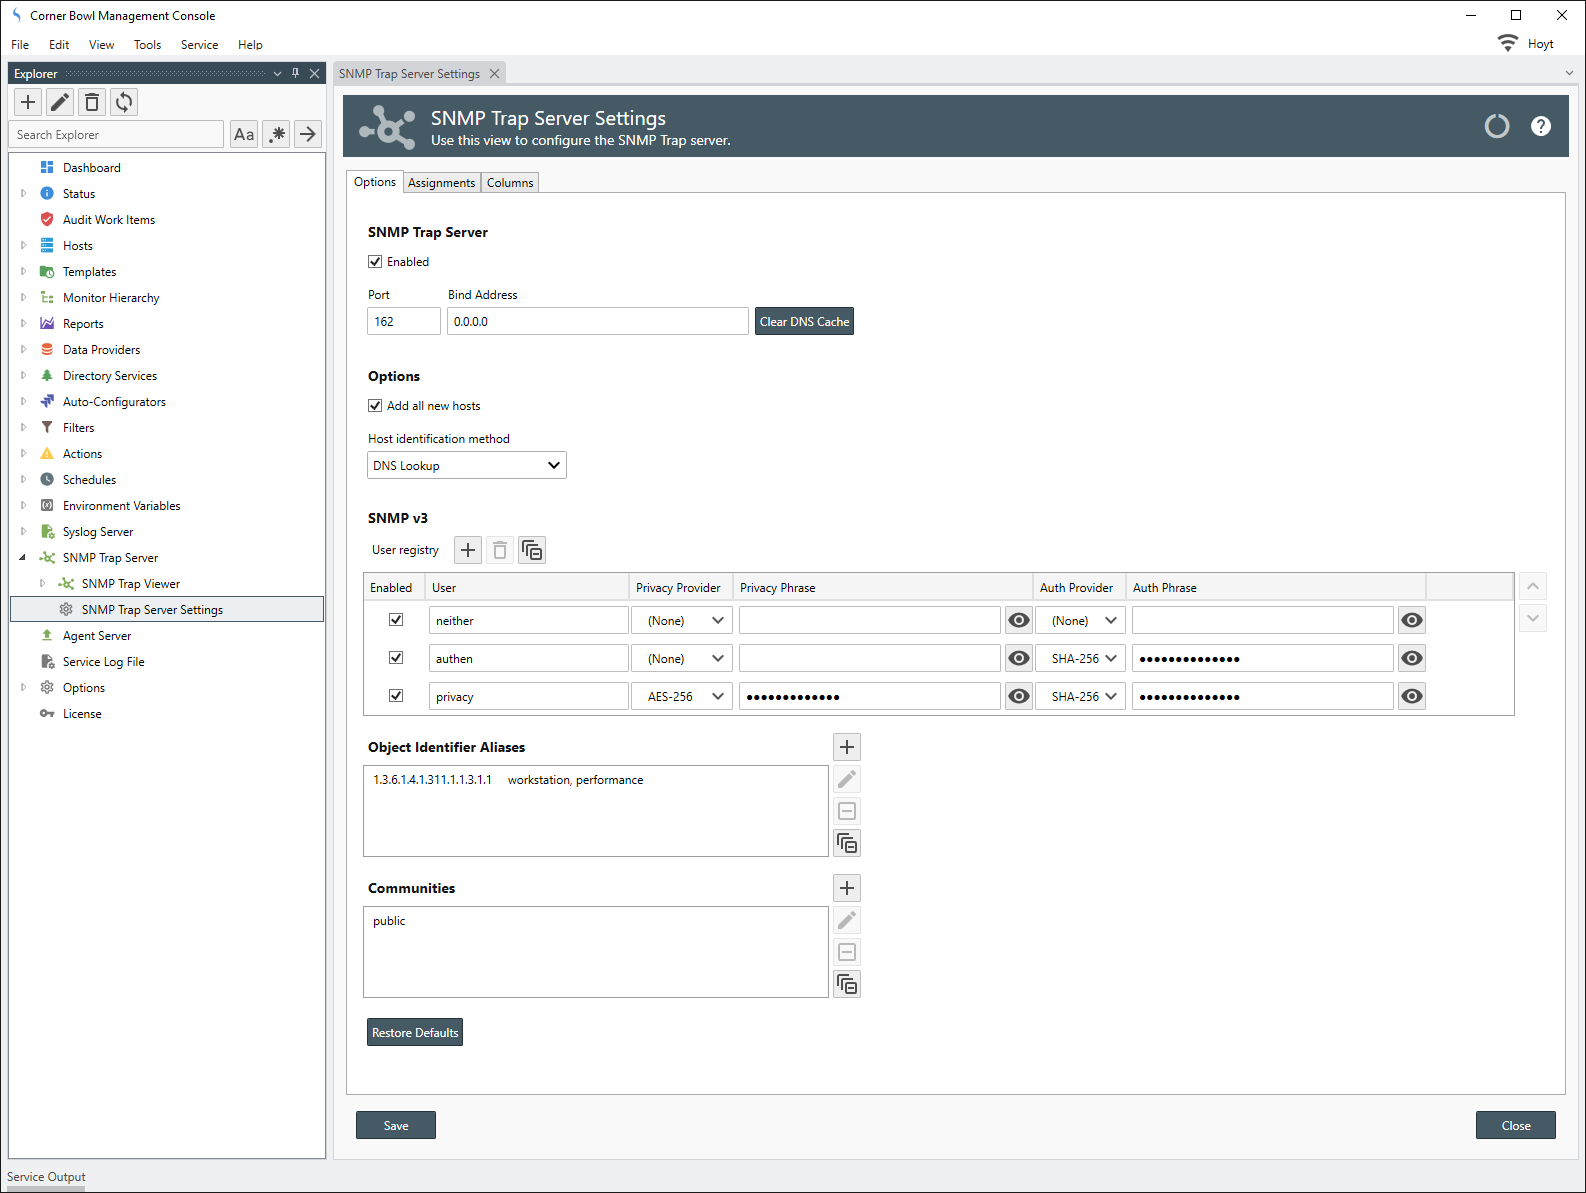
SNMP Trap Server Settings
Server Manager contains an internal SNMP server. The SNMP server can be used to receive and forward traps from both computers and devices such as switches, routers, firewalls, and Unix and Linux servers. By default, when a trap is received from a device, the Server Manager automatically adds the device's IP or hostname to the Explorer view and if Trap Consolidation is enabled, the trap saved to the Primary Data Provider.
In this Topic
How to configure the SNMP Trap Server
- From the Explorer View, navigate to Options, then select SNMP Trap Server Properties. The SNMP Trap Server Properties View displays.
- The SNMP Trap Server Properties View contains 3 tabs.
- Options
- Assignments
- Columns
SNMP Trap Server
- Check the Enabled check box to enable the SNMP Trap Server.
- Use the Port text box to specify the port. The default value is 162.
- Use the Bind address text box to specify the local address to Bind the SNMP Trap Server. The default is 0.0.0.0 which binds to all local IP addresses.
- Clicking Clear DNS Cache empties any prior DNS cached values.
Options
- Use the Add all new hosts check box to automatically add any SNMP device to the software when a SNMP trap is received from the device for the first time.
Note
Devices sending SNMP traps to Server Manager are automatically be added to the Explorer View under the Hosts/SNMP Devices node then the templates, such as SNMP Trap Consolidation automatically assigned. If you prefer to explicitly specify which SNMP devices can save traps to the Log Database, clear this option then manually add each SNMP device you want to support. Finally, assign the SNMP Trap Consolidation template to each new SNMP device or the Host Group where you added the SNMP devices.
- Use the Host identification method drop-down to select how you would like connecting hosts to be identified.
| Option | Description |
|---|---|
| DNS Lookup | The server uses DNS to resolve the hostname. |
| DNS and FQDN Lookup | The server uses DNS and Active Directory to resolve the Fully Qualified Domain Name (FQDN). |
| Remote IP Address | The server uses the IP address. |
SNMP v3
- Use the User registry controls to manually assign each security method to enable.
Note
To configure SNMP v3 device connectivity, see: SNMP Device Connection Properties
Object Identifier Aliases
- Choose or create new Object Identifier Aliases with unique OIDs so Server Manager can display the friendly name in the Management Console and triggered Actions rather than the OID.
Note
To automaitically resolve OIDs using MIB files, see: SNMP
Communities
- Choose or create new SNMP v2 Communities to listen and accept.
SNMP Trap Server Properties View
SNMP Device Connection Properties